|
 |
 |
|
|
|
|
Before installing your GNU/Linux, when booting into a LiveCD session, you should check your Wi-Fi connection. If it does not work, it could be due to various reasons, including compatibility issues with your Wi-Fi card or missing drivers, then you should replace your WiFi card.
Errors indicating that keys cannot be verified during package installation or upgrade.
pacman -Sy archlinux-keyring --noconfirm # Ensure that the system's keyring is up-to-date, which helps in verifying the authenticity of packages during installation or upgrade.
Sometimes there are errors retrieving some packages from the specified mirrors. You may change your mirrors by editing your /etc/pacman.d/mirrorlis or
  sudo pacman -Sy reflector # Reflector is a Python script that can retrieve the latest mirror list from the Arch Linux Mirror Status page.
  sudo reflector --verbose --country 'Spain' --latest 5 --sort rate --save /etc/pacman.d/mirrorlist # Change Mirrors: Sometimes, certain mirrors may have issues or be temporarily unavailable. You can try switching to a different mirror.
It is very difficult to give you a definitive answer: check system resources (top, htop), logs, run memory tests (Memtest86), check for overheating, your hardware and recently installed software, update your drivers and firmware, perform system maintenance (cleaning clutter such as temporary files, removing unnecessary software), and ultimately, when all hope is gone, seek professional help.
By default, cloning a Git repository creates a copy of the entire remote repository on the local machine. It is useful when fixing a bug or cleaning up and reducing the size of a git repository (the .git folder could become)
git checkout --orphan abranchnane # Start a new branch from scratch without any previous commit history.
git add -A # Stage all changes in the working directory for the next commit.
git commit -am "Fresh start"
git branch -D main # The `git branch -D main` command is used to forcefully delete the specified branch named "main" in Git.
git branch -m main # Rename the current branch to "main" in Git.
git push -f origin main # It pushes the renamed branch ("main") to the remote repository and sets it as the upstream branch.
git gc --aggressive --prune all # It performs garbage collection, which cleans up unnecessary files and optimizes the repository for better performance. --aggressive runs a more aggressive garbage collection
When I tried to run: git push, I just got fatal: the remote end hung up unexpectedly Everything up-to-date
This error typically occurs when Git encounters large files or a large number of changes during the push, leading to the connection being terminated prematurely.
Solution:
git config http.postBuffer 524288000 # By increasing the http.postBuffer size, you provide more buffer space for Git to handle larger payloads during the push operation, thereby preventing the remote end from hanging up unexpectedly.
git push
sudo mkdir -p /run/media/nmaximo7/mydisk1 # Create directories for mounting the partitions.
sudo mkdir -p /run/media/nmaximo7/mydisk2
blkid # Identify the drives and their partitions.
/dev/nvme0n1p1: UUID="6D37-71F1" BLOCK_SIZE="512" TYPE="vfat" PARTUUID="3fbc4526-c0ae-475b-b775-a503c5394eca"
/dev/nvme0n1p2: UUID="f28469fa-378e-4548-b646-3af8542ddaab" BLOCK_SIZE="4096" TYPE="ext4" PARTUUID="68bdbf55-5b11-4644-ae88-59dac470188a"
/dev/sda1: UUID="bd753b26-a4ec-4063-8d36-5215c358ed00" BLOCK_SIZE="4096" TYPE="ext4" PARTLABEL="mydisk" PARTUUID="8c3029bc-0bfa-4dc0-a80b-a0dadbca6e42"
/dev/sdb1: LABEL="mydisk2" UUID="cb8ee0c2-6afe-4853-ae39-0cc1dce73ef0" BLOCK_SIZE="4096" TYPE="ext4" PARTLABEL="Elements" PARTUUID="857f50ed-94ef-4b8a-aeee-574443340c4b"
sudo nvim /etc/fstab
UUID=cb8ee0c2-6afe-4853-ae39-0cc1dce73ef0   /run/media/nmaximo7/mydisk1   ext4   defaults   0   2
UUID=bd753b26-a4ec-4063-8d36-5215c358ed00   /run/media/nmaximo7/mydisk2   ext4   defaults   0   2
sudo chown -R nmaximo7:nmaximo7 /run/media/nmaximo7/mydisk2 # It recursively change the ownership of all files and directories under `/run/media/nmaximo7/mydisk2` to the user and group `nmaximo7`; the `-R` option applies the change recursively.
sudo mount -a # Read the /etc/fstab configuration file and mount all entries in `/etc/fstab`.
systemctl daemon-reload # Reload the systemd daemon to apply the changes.
Previously you should have already install timeshift, run it, and create some snapshots.
yay -S timeshift
Boot into a Live Environment. Start your computer using a live USB (You may need to adjust your BIOS/UEFI settings to boot from the pendrive, e.g., F8 in startup and select your USB) with an Arch Linux image or Ubuntu. If you have Ubuntu, you will need to install timeshift, but you will have a GUI:
  sudo add-apt-repository universe
  sudo apt install timeshift
However, you can just boot from the Linux Mint ISO, and launch Timeshift.
Mount the Root (/) Partition: sudo mkdir /mnt/arch, sudo mount /dev/sdXY /mnt/arch, e.g., sudo mount /dev/nvme0n1p2 /mnt/arch
  lsblk (fdisk -l)
  NAME        MAJ:MIN RM   SIZE RO TYPE MOUNTPOINTS
  sda           8:0    0   2.7T  0 disk
  └─sda1        8:1    0   2.7T  0 part /run/media/nmaximo7/mydisk1
  sdb           8:16   0   1.8T  0 disk
  └─sdb1        8:17   0   1.8T  0 part
  zram0       254:0    0     4G  0 disk [SWAP]
  nvme0n1     259:0    0 238.5G  0 disk
  ├─nvme0n1p1 259:1    0   512M  0 part /boot
  └─nvme0n1p2 259:2    0   238G  0 part /
Navigate to the Timeshift snapshots directory, e.g., cd /mnt/arch/timeshift.
List all the available snapshots and choose the one you want to restore, e.g., ls /mnt/arch/timeshift/snapshots/
Restore the Snapshot: timeshift ‐-restore ‐-snapshot “YYYYMMDD-HHMMSS”; where ‐-restore specifies that you want to restore a snapshot; ‐-snapshot “YYYYMMDD-HHMMSS”; is used to specify the snapshot you want to restore. The timestamp format is Year-Month-Day-Hour-Minute-Second.
Unmount the Partition: sudo umount /mnt/arch
Reboot: sudo reboot
If you’re recovering from a snapshot using Timeshift from a LiveCD with Arch, you need to mount the root partition (sudo mount /dev/nvme0n1p2 /mnt/arch), mount the snapshot location (sudo mkdir /mnt/snapshots, sudo mount /dev/sda1 /mnt/snapshots -we are supposing that you have configured your drive sda to save your snapshots-), restore the snapshot (timeshift ‐-restore ‐-snapshot “YYYYMMDD-HHMMSS” ‐-backup-device /dev/sda1 ‐-target /mnt/arch/), umount partitions (sudo umount /mnt/snapshots, sudo umount /mnt/arch).
Another option is: mount root partition (sudo mount /dev/nvme0n1p2 /mnt/arch), chroot into root partition (sudo arch-chroot /mnt/arch), restore snapshot: timeshift ‐-restore ‐-snapshot “YYYYMMDD-HHMMSS” ‐-backup-device /dev/sda1 ‐-target-device /dev/sda1 ‐-skip-grub
The easy solution: sudo passwd root.
To change a user’s password in Arch Linux using a pendrive in VirtualBox:
Boot from the Pendrive: Insert the pendrive containing the Arch Linux live environment into your computer and boot from it.
You have to hold down or repeatedly type the ESC key while the VM is booting, then you can get to the black-on-gray EFI boot menu, where you can pick to boot from, e.g., Boot Manager, UEFI VBOX HARDDRIVE.
Create a mount point: sudo mkdir /mnt/arch
Mount the Arch Linux Partition: sudo mount /dev/sdXY /mnt/arch, e.g., sudo mount /dev/nvme0n1p2 /mnt/arch. Use lsblk command to identify the partition where Arch Linux is installed.
Chroot into the System: Now, you need to chroot into your Arch Linux system: sudo arch-chroot /mnt/arch.
If you get the error: chroot: failed to run command /usr/bin/zsh: No such file or directory. Then, you should specify the shell explicitly: sudo arch-chroot /mnt/arch /bin/bash.
When you chroot into a directory, you’re creating a temporary environment that has its own root directory, i.e, you’re entering a chroot environment that represents your installed Linux system so you can repair a broken system, reset passwords, or install or upgrade its software.
Change the Password: Use the passwd username command to change the password of username or just passwd to change the root password
Exit the chroot environment (exit), unmount the Arch Linux partition (exit sudo umount /mnt/arch), and. Reboot your system (reboot).
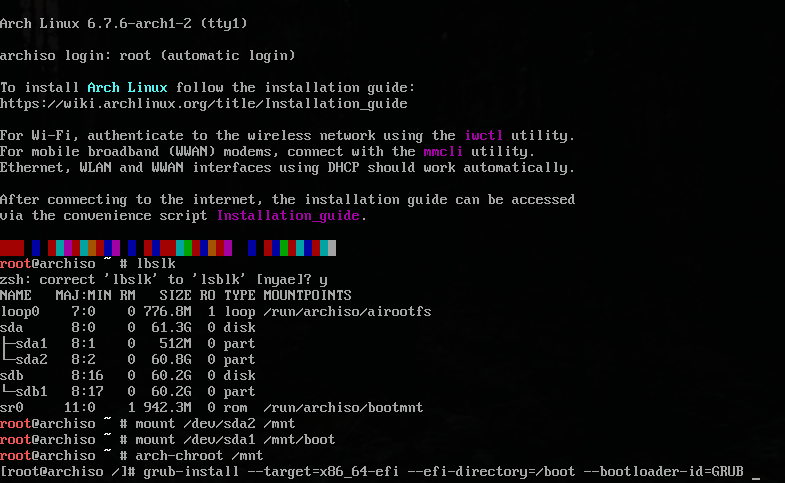
Boot from the Pendrive: Insert the pendrive containing the Arch Linux live environment or any other live Linux ISO into your computer and boot from it.
Mount the boot and the linux partition: identify your partitions (lsblk), mount your boot (mount /dev/sda1 /mnt/boot) and root (mount /dev/sda2 /mnt) partitions.
Install the GRUB bootloader on a system configured for UEFI booting:
grub-install --target=x86_64-efi --efi-directory=/boot/efi --bootloader-id=GRUB
grub-install’s arguments:
‐‐ efi-directory=/boot/efi = It specifies where the EFI System is mounted.
‐‐ bootloader-id=GRUB = It is the bootloader identifier, it’s set to GRUB, which is the default identifier used by GRUB.
‐‐ target=x86_64-efi = It installs GRUB for x86_64 systems.
Grub is one of the most common booloader for GNU/Linux distributions. It allows you to choose between different operating systems, if there is more than one on your system.
If grub is not installed, you will need to do so: sudo pacman -S grub.
Chroot into the System: sudo arch-chroot /mnt
After the installation, the configuration file /boot/grub/grub.cfg needs to be generated by using grub-mkconfig:
grub-mkconfig -o /boot/grub/grub.cfg

# Exit the new system, unmount the partitions, and reboot.
exit
umount -R /mnt
echo All Done. Type "reboot" to enjoy!

JustToThePoint Copyright © 2011 - 2024 Anawim. ALL RIGHTS RESERVED. Bilingual e-books, articles, and videos to help your child and your entire family succeed, develop a healthy lifestyle, and have a lot of fun. Social Issues, Join us.
This website uses cookies to improve your navigation experience.
By continuing, you are consenting to our use of cookies, in accordance with our Cookies Policy and Website Terms and Conditions of use.