|
 |
 |
|
 |
|
|
|
|
|
|
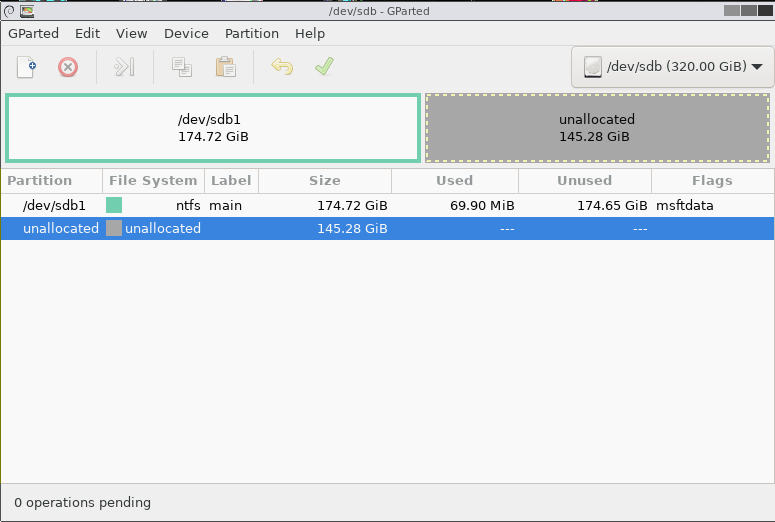
Disk management tools are utility software that is used to manage data on disk by performing various functions on it, such as partitioning devices, manage drives, disk checking, disk formatting, etc.
Partition management software programs let you create, delete, shrink, expand, split, or merge partitions on your hard drives or other storage devices.
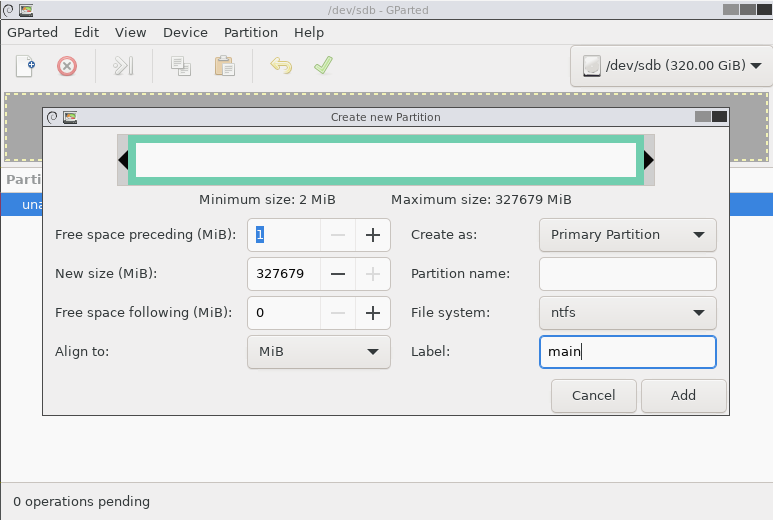
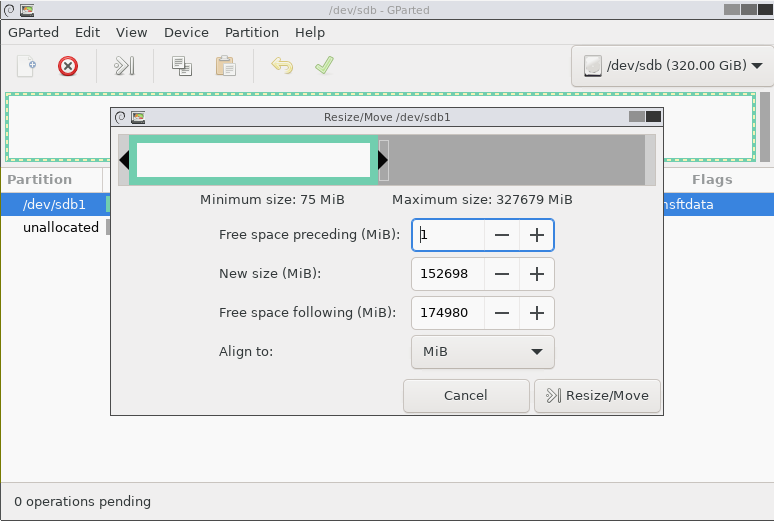
You can move the slider back and forth to change the size of the partition or type it directly in the New size (MiB) textbox.
To manually create and format new partitions in GNU/Linux, read our article Programming in Linux. Installing Arch from Scratch
❯ lsblk -f # Output info about file systems
NAME        FSTYPE FSVER LABEL   UUID                                 FSAVAIL FSUSE% MOUNTPOINTS
sda
└─sda1      ext4   1.0   mydisk1 bd753b26-a4ec-4063-8d36-5215c358ed00  692.3G    70% /media/mydisk1
sdb
└─sdb1      ext4   1.0   mydisk2 cb8ee0c2-6afe-4853-ae39-0cc1dce73ef0    1.1T    33% /media/mydisk2
sdc
├─sdc1      exfat  1.0   Ventoy  B941-1CAD
└─sdc2      vfat   FAT16 VTOYEFI 1B11-976A
nvme0n1
├─nvme0n1p1 vfat   FAT12         29E2-81C1                               702K    30% /boot/efi
├─nvme0n1p2 ext4   1.0           c5e135cd-f8b9-4226-a08c-0a0df899d656   17.4G    36% /
├─nvme0n1p3 swap   1             f581d4da-70e2-4894-8a47-d0d4f3c37e94                [SWAP]
└─nvme0n1p4 ext4   1.0           cf630845-b11e-4ef1-8a94-5771185aef30   99.3G    46% /home
# Static information about the filesystems.
# /dev/nvme0n1p2
UUID=c5e135cd-f8b9-4226-a08c-0a0df899d656	/         	ext4      	rw,relatime	0 1

# /dev/nvme0n1p1
UUID=29E2-81C1      	/boot/efi 	vfat      	rw,relatime,fmask=0022,dmask=0022,codepage=437,iocharset=ascii,shortname=mixed,utf8,errors=remount-ro	0 2

# /dev/nvme0n1p4
UUID=cf630845-b11e-4ef1-8a94-5771185aef30	/home     	ext4      	rw,relatime	0 2

# /dev/nvme0n1p3
UUID=f581d4da-70e2-4894-8a47-d0d4f3c37e94	none      	swap      	defaults  	0 0
sd is a mass storage driver, sda is the first registered device on the driver and sdb is the second. Finally sda1 is a block device file that corresponds to the first drive partition on the first registered device.
# /dev/disk/by-uuid/bd753b26-a4ec-4063-8d36-5215c358ed00 or /dev/sda1.
/dev/disk/by-uuid/cb8ee0c2-6afe-4853-ae39-0cc1dce73ef0 /media/mydisk2 auto nosuid,nodev,nofail,x-gvfs-show 0 0
/dev/disk/by-uuid/bd753b26-a4ec-4063-8d36-5215c358ed00 /media/mydisk1 auto nosuid,nodev,nofail,x-gvfs-show 0 0
Safety isn’t expensive, it’s priceless.
This is how you partition and format your hard drive to install Arch from Scratch.
sgdisk is a command-line utility for manipulating partition tables under Linux. Let’s start by partitioning our Virtual Machine’s drive (/dev/sda1):
user@pc:~$ sgdisk --za-all /dev/sda # Wipe out the partition table (it deletes all GPT and MBR entries and creates a new GPT -GUID Partition Table-) and any data on it!
sgdisk -og /dev/sda # It creates a fresh GPT disk.
sgdisk -n 1:2048:+1M -c 1:"BIOS Boot Partition" -t 1:ef02 /dev/sda # Create four partitions.
sgdisk -n 2:0:+40G -c 2:"Linux /" -t 2:8304 /dev/sda
sgdisk -n 3:0:+2G -c 3:"[SWAP]" -t 3:8200 /dev/sda
sgdisk -n 4:0:0 -c 4:"Linux /home" -t 4:8302 /dev/sda
mkfs.vfat /dev/nvme0n1p1 # Format the partitions.
mkfs.vfat /dev/sda1
mkfs.ext4 /dev/sda2
mkfs.ext4 /dev/sda4
mkswap /dev/sda3 # It sets up a Linux swap on the third partition.
swapon /dev/sda3 # It enables it for swapping.
Let’s work in our main machine (In GNU/Linux, the first NVMe-SSD is called /dev/nvme0n1) with a bash script.
#!/bin/bash
# The order lsblk lists all block-level devices available on your system.
disk=/dev/nvme0n1

# Wipe out the partition table (it deletes all GPT and MBR entries and creates a new GPT -GUID Partition Table-) and any data on it!
sgdisk --zap-all $disk

# Partition the drive:
sgdisk -og $disk # Convert an MBR (Master Boot Record) or BSD disklabel disk to a GPT disk.
We are creating four partitions: sgdisk -n,
It creates the following partitions: /boot/ -1M-, / (root) -30G-, swap -2G-, and /home -the remaining disk space.
sgdisk -n 1:2048:+1M    -c 1:"BIOS Boot Partition"  -t 1:ef02 $disk
sgdisk -n 2:0:+30G      -c 2:"Linux /"              -t 2:8304 $disk
sgdisk -n 3:0:+2G       -c 3:"[SWAP]"               -t 3:8200 $disk
sgdisk -n 4:0:0         -c 4:"Linux /home"          -t 4:8302 $disk

# Format the partitions. mkfs stands for “make file system.”
mkfs.vfat /dev/nvme0n1p1
mkfs.ext4 /dev/nvme0n1p2
mkfs.ext4 /dev/nvme0n1p4
# mkswap sets up a Linux swap area on the third partition of our disk.
mkswap  /dev/nvme0n1p3
# swapon enables it for swapping.
swapon  /dev/nvme0n1p3

JustToThePoint Copyright © 2011 - 2024 Anawim. ALL RIGHTS RESERVED. Bilingual e-books, articles, and videos to help your child and your entire family succeed, develop a healthy lifestyle, and have a lot of fun. Social Issues, Join us.
This website uses cookies to improve your navigation experience.
By continuing, you are consenting to our use of cookies, in accordance with our Cookies Policy and Website Terms and Conditions of use.