|
 |
 |
|
 |
|
|
|
|
|
|
To err is human, but to really foul things up you need a computer, Paul R. Ehrlich
Don’t believe anything you read on the net. Except this. Well, including this, I suppose, Douglas Adams.
He has personality problems beyond the dreams of analysts, Douglas Adams.
There are four main stages in the boot process of any computer:
The BIOS is the Basic Input/Output System. It is accessed and configured through the BIOS Setup Utility. First, the computer runs a Power-On Self Test. It is a special set of ROM routines designed to test whether system components, such as RAM modules, keyboards, and disk drives, are functioning properly before attempting to boot the operating system.
Typically, the BIOS checks the master boot record on the primary hard disk to see what to load next. This is a section on your hard drive where the bootloader is located.
The bootloader loads the kernel of the operating system into memory and then starts it with a set of kernel parameters. One of the most common bootloaders is GRUB.
When the kernel is loaded, it immediately initializes devices, their drivers, and the computer’s memory, and mounts the root file system. The main job of the kernel is to load up the init process.
The init process is the first process that get started. It starts essential services, daemons, and other background processes on your system.
There are two types of BIOS: Legacy BIOS (Basic Input Output system) and UEFI (Unified extensible firmware interface). UEFI has mouse support and a GUI interface.

To access your BIOS, you’ll need to press a key, such as F1, F2, Esc, Del, etc. during the boot-up process. It’s often displayed on the screen during the boot process and a message will read something like Press F1/F2 to access BIOS or enter setup.
This is my manual instructions about how to enter the BIOS at startup:
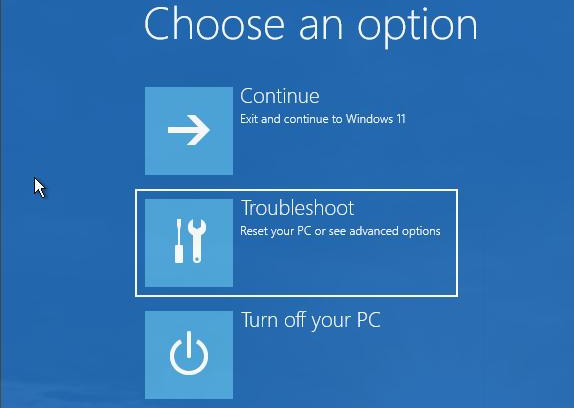
On some PCs you may not be able to press a key to access your BIOS. If this is your case, go to Start menu, click on the Power button, hold down the Shift key while clicking on Restart. Then, navigate through Troubleshoot, Advanced Options, UEFI Firmware Settings.
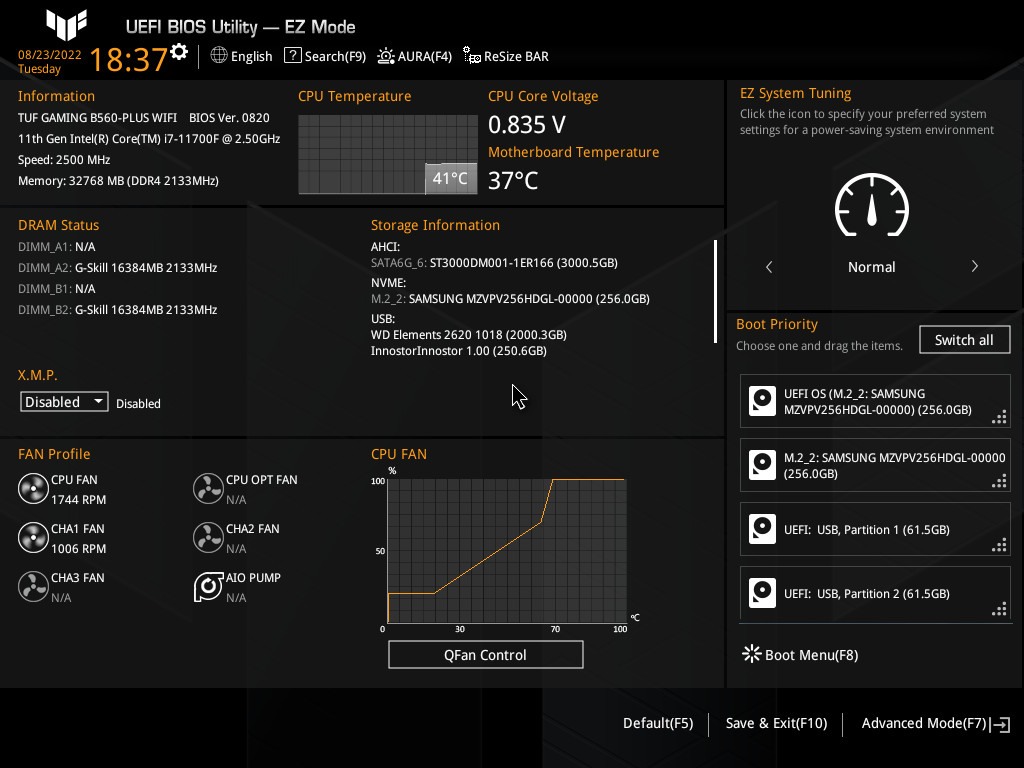
There is a lot of useful information being displayed on the BIOS’s main screen. It is a UEFI-BIOS Utility in EZ Mode, the BIOS version is 0820. The Motherboard model is an Asus TUF GAMING B560-PLUS and the CPU is an 11th Gen Intel(R) Core(TM) i7-11700 @ 2.50GHz. The total installed memory is 2 (DIMM_A2, DIMM_B2) * 16384MB = 32768 MB. The Memory Frequency of the 2 DDR4 RAM Modules are 2133MHz.
The CPU temperature is 41°C and the motherboard temperature is 37°C. When the computer is idle, these values should not exceed 75°C for the CPU and 60 °C for the motherboard.
You can use the mouse, the up or down arrow keys or the + or – keys to change a field.
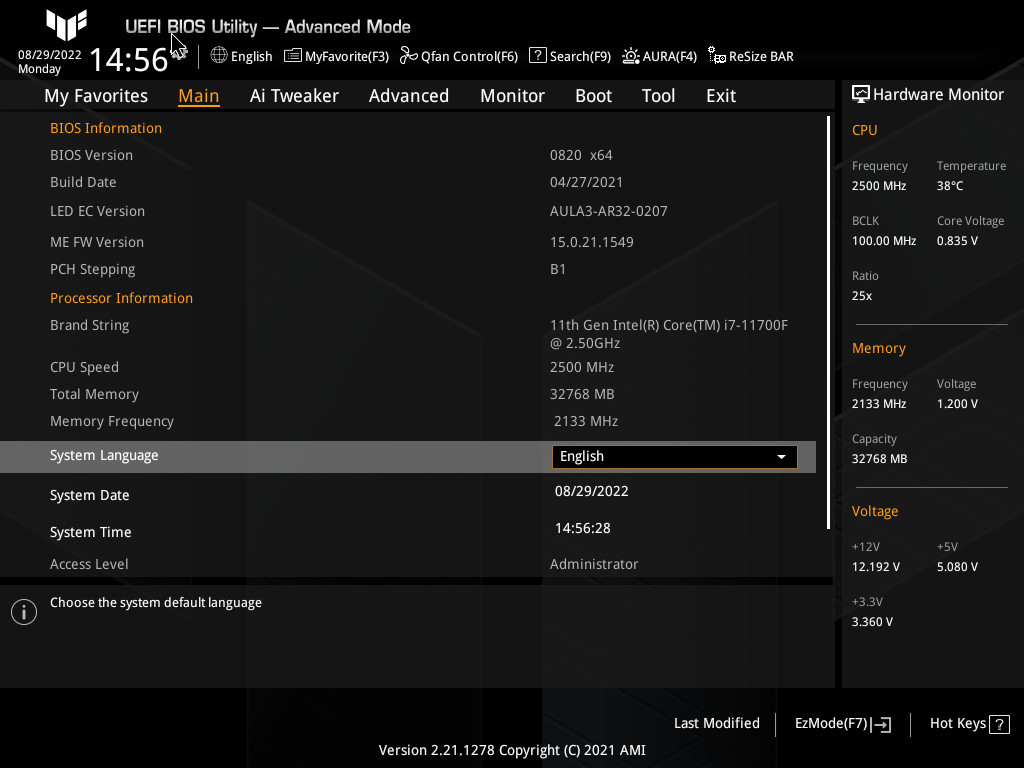
Every BIOS setup utility is different, so the specifics on where the boot order options are located varies from one computer to another.In my case, I need to press the F7 function to switch to the Advanced mode.
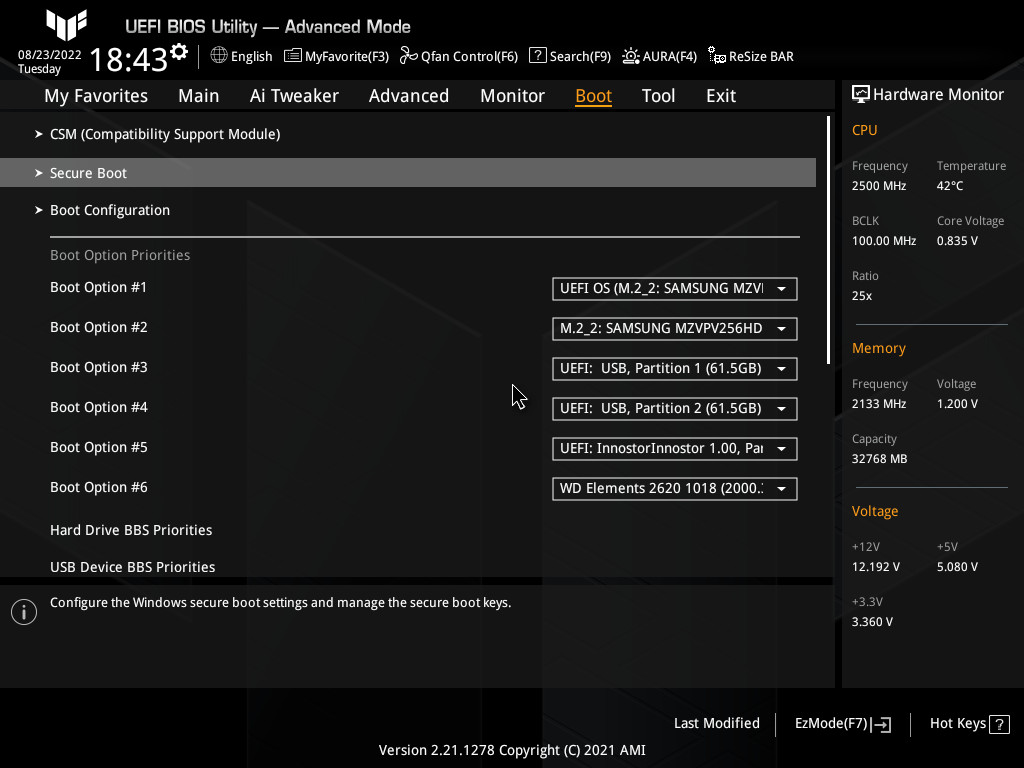
This is the Boot tab of the Advanced Mode UEFI BIOS screen. The order in which the devices are listed is the order in which your computer will look for a device to boot from. Click on Boot Option #1 and a list of available devices will appear. Make sure that the boot option comes with the correct media storage selected, e.g., my SSD SAMSUMG M:2 256GB is the first boot device. Typically, your first boot device is your SSD or hard disk containing Windows 10/11 or a GNU/Linux distribution.
A common legacy BIOS setting could be as follows: Advanced BIOS Feature, Hard Disk Boot Priority (1. Samsung SSD Drive; 2. Hard Disk HDD Seagate Barracuda); First Boot Device [USB-HDD] (any USB device); Second Boot Device [CDROM] (CD/DVD); Third Boot Device [HDD, Hard Disk]
If you want to boot from an USB media (Windows rescue media or a Linux USB Live drive), you must change the BIOS boot order so the USB device is listed first.Otherwise, if the USB boot option is not the first in the boot sequence, your PC will start normally, i.e., boot from your hard drive or SSD drive listed first.
If it does not work, recheck the BIOS boot order, try to insert your USB into another port on your PC, recreate your USB stick, or even update your motherboard drivers or BIOS to the most current version.
Go to the Exit tab, then select Save Changes & Reset. It is worth noticing that there are other useful options: Load Optimized Defaults is a safe fallback option if you mess things up; Discard Changes & Exit is another safe option if you do not remember what you’ve changed or you are not sure about these changes.

You can enable or disable the Fast Boot function by navigating through Boot, Boot Configuration, Fast Boot. It is a feature that provides a faster boot time when starting up your PC. If you are using a dual boot system with both Windows and GNU/Linux, you should disable it immediately after a fresh install. Besides, some Windows updates may fail if fast boot is enabled.😞

Boot Logo Display: Full Screen (it sets the boot logo display in full screen)/disable (it disables the boot logo display). Post Delay Time allows you to select an additional waiting time to easily enter the BIOS Setup.
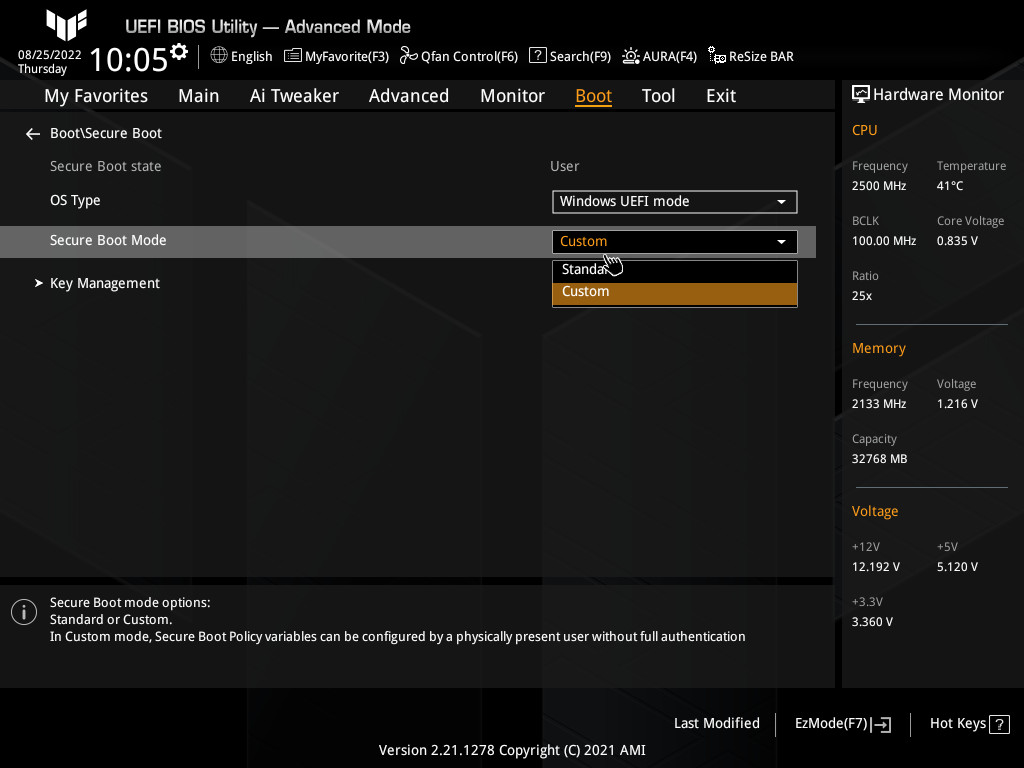
Security Boot is a UEFI firmware security feature to help make sure that your computer boots using only software that is trusted by the PC manufactured. It prevents drivers, bootloaders, or operating systems from loading if they are not signed with a valid digital signature. If you are running some graphics cards, very specific hardware, Windows 7, or GNU/Linux, you may need to disable Secure Boot.
Typically, go to the Security tab, Secure boot, and disable Secure Boot Control. In my case, Boot, Secure Boot, OS Type (Windows UEFI mode -Only select this option when booting on Windows, i.e., secure boot compliant OS-/Other OS). The former option lets you boot OS like GNU/Linux distros that don’t have their bootloaders signed.
XMP is an Intel technology that allows you to change multiple memory settings by simply selecting a different profile. XMP profiles can be understood as memory overclocking settings that are already configured, tested, and saved directly on the RAM modules.
In the newest motherboards, you’ll find it on the first screen of your BIOS or you can also find it on the Advanced Mode interface, (AI) Tweaker, Extreme Memory Profile(X.M.P.). Select it and you should see the list of available XMP profiles, you’ll probably want to go with the fastest one 😄.
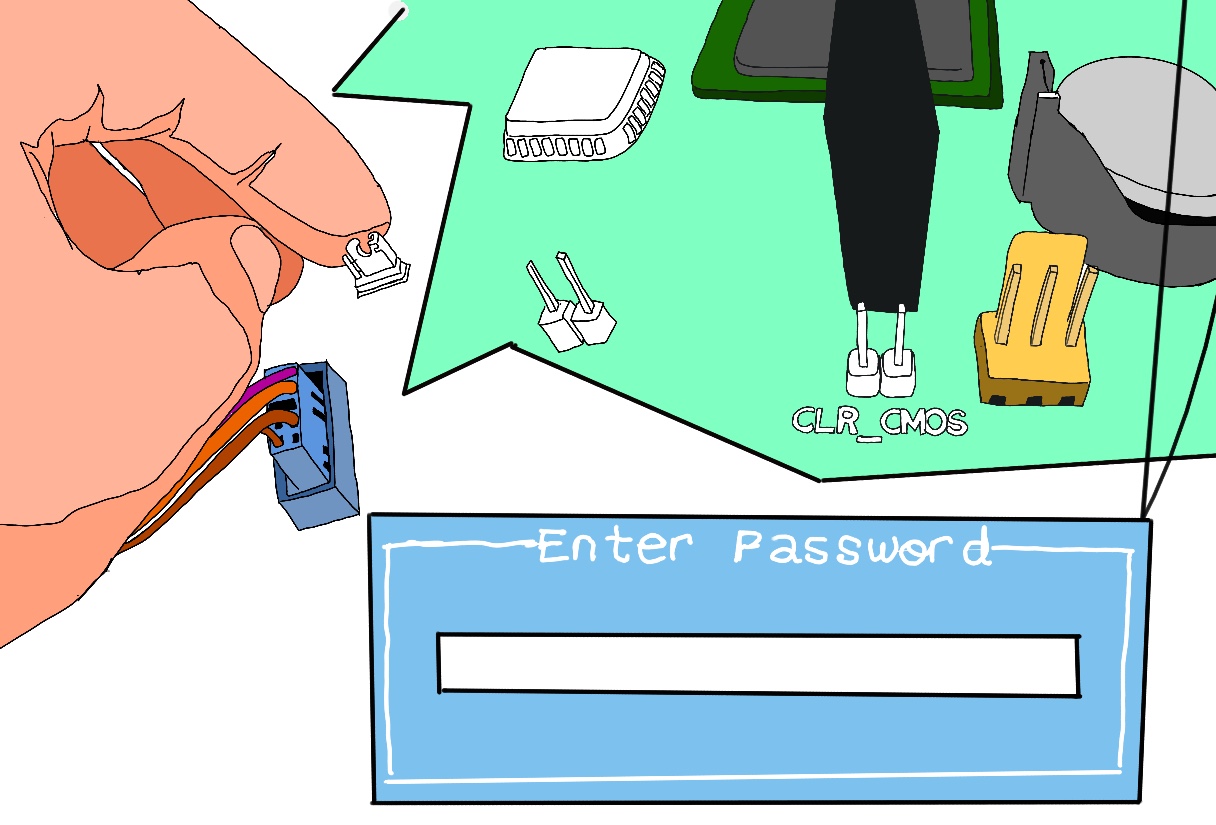
If you want to set an Administrator Password and/or a User Password in your BIOS or you need to reset or clear a BIOS password, read our article How to create and remove a BIOS password.
You should only flash your BIOS if there is a real need to do so, e.g., to add support for newer processors, larger hard drives and solid state drives, or you need to fix something. If the power supply goes out while the BIOS is being flashed, it can leave you with a permanently damaged BIOS. It usually renders your motherboard as a useless electronic garbage.
I recommend that you start by going to the manufacture’s website, e.g., https://www.asus.com/uk/, download your motherboard’s manual, and search for the latest BIOS firmware for your exact model: Support, Drivers & Tools, BIOS & FIRMWARE, e.g., Version 1601, TUF GAMING B560-PLUS WIFI BIOS 1601, Improve system’s compatibility.
Click on Download, extract the file, and copy it onto a USB Flash drive (FAT32). It contains a BIOS file (.CAP) and a BIOSRenamer.exe utility to automatically rename the BIOS file (.CAP). Double click on the BIOSRenamer.exe utility. Once it is completed, press any key to end this process. Copy the renamed BIOS file (.CAP) to the root directory of the USB flash drive.
Plug the USB Flash drive into a USB port on the computer. Boot into your BIOS, Advanced Mode, go to the Tool menu to select ASUS EZ Flash 3 Utility (it allows you to update your BIOS). Select via Storage Device(s) as the BIOS update method, then locate your USB Flash drive and the file that you have just renamed from the motherboard’s manufacturer. Reboot the system when the update process is done.

JustToThePoint Copyright © 2011 - 2024 Anawim. ALL RIGHTS RESERVED. Bilingual e-books, articles, and videos to help your child and your entire family succeed, develop a healthy lifestyle, and have a lot of fun. Social Issues, Join us.
This website uses cookies to improve your navigation experience.
By continuing, you are consenting to our use of cookies, in accordance with our Cookies Policy and Website Terms and Conditions of use.