|
 |
 |
|
 |
|
|
|
|
|
|
Privacy is one of the biggest problems in this new electronic age, Andy Grove
Privacy is an inherent human right, and a requirement for maintaining the human condition with dignity and respect, Bruce Schneier
We are living in difficult times, there is no doubt about it. Privacy is both a human right and a necessity, and big companies, tech titans, governments, small companies, and hackers constantly attacking and diminishing our privacy has a corrosive and perversive effect on all of us. Unfortunately, there is a plethora of malware, such as ransomware, viruses, spyware, computer worms, and Trojan horses attacking our privacy.
And therefore your banking information, sensitive photos and videos, meant only for your personal viewing, and other confidential and private files and data are the target of many parties. Documents, media, and other files have the bad habit of being around on your computer, even long after you have supposedly deleted them.
Deleting a file will only move it into the Recycle bin and you have to manually empty the Recycle bin to remove that file. Moreover, deleting a file will not physically remove it from your hard driveand therefore, it will absolutely not prevent third party utilities from un-deleting it again and get unauthorized access to your content. However, the good news is that secure file deletion utilities are available.

Sometimes, you should delete your files permanently because you are either selling your computer or want your files and data gone permanently for security and privacy reasons.
If you are a Windows user, you should install Sysinternal Suite. It is a bundle of very handy and robust Windows tools and utilities developed by Mark Russinovich.
Download the Sysinternal Suite and extract it to the location of your choosing, e.g., c:\sysinternal.
Launch Windows Terminal (Admin) -with administration privileges- and go to the directory where you have extracted Sysinternal Suite.
Type .\sdelete /? to get basic information about sdelete’s options and syntax.
To delete securely and permanently a file, write the following command in the terminal: .\sdelete -p 5 myfile. The option -p 5 tells the utility to make five passes over the data, writing random characters over myfile five times.
You may want to add sysinternal to the PATH by pressing the Windows + X, select the System option. Scroll down to the bottom and click the About section, then click the Advanced system settings link. In the following window (System Properties), click the Advanced tab, then the Environment Variables button. Select or highlight the Path variable in the System variables section and clic Edit.
Let’s securely delete the directory (recursively “-r”) c:\Users\nmaxi\Downloads\mySecrets by typing: .\sdelete -p 5 -r -s c:\Users\nmaxi\Downloads\mySecrets. It specifies “-p 5” five as the number of overwrite passes and we also remove read-only attributes, if set.
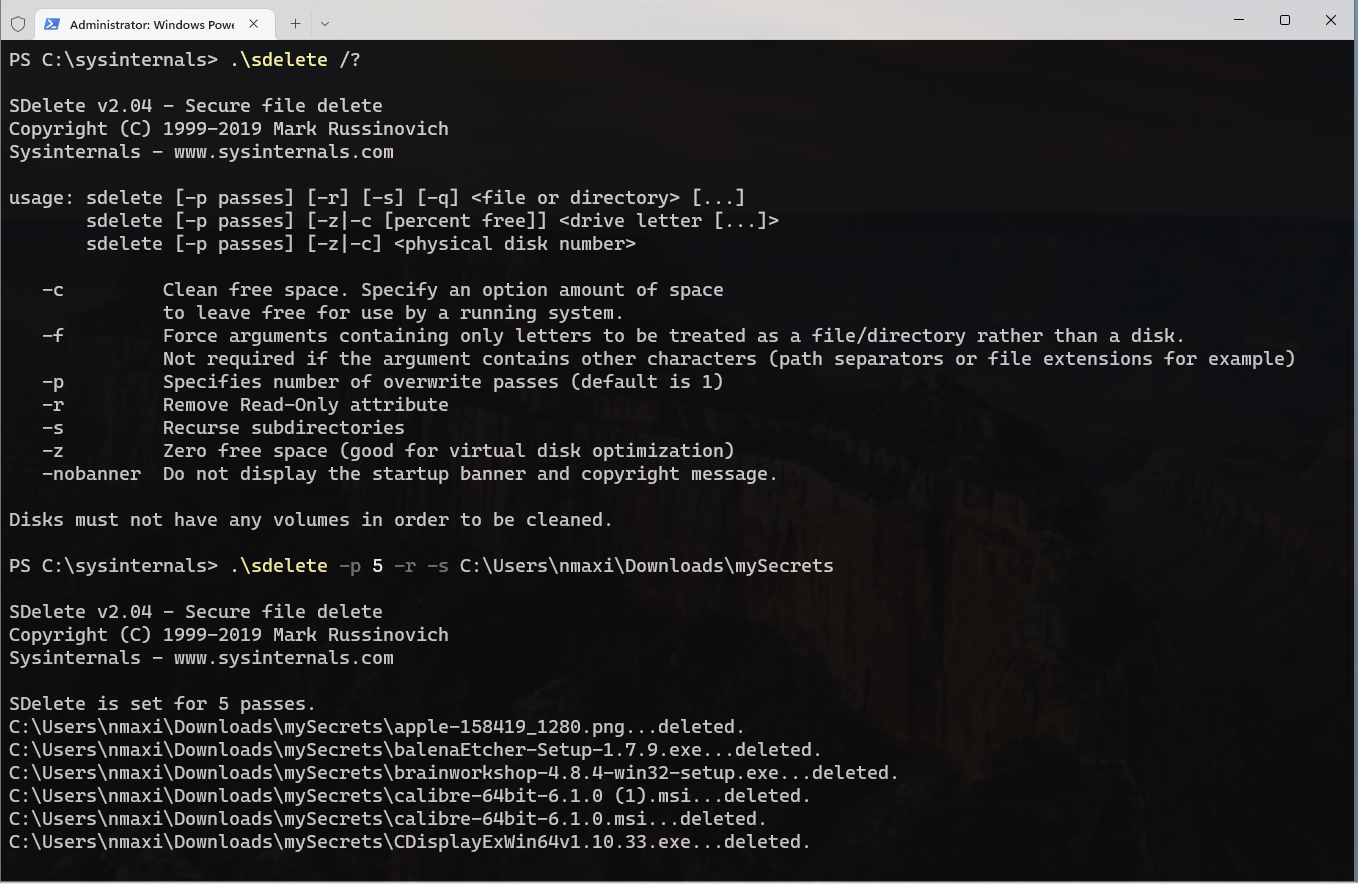
sdelete
Clean and delete free space in the c or f drive (it won’t impact existing files and directories): .\sdelete -c -p 5 c: or .\sdelete -c -p 5 f:
Zero free space (good for virtual disk optimization). It fills the unused space with zeros: .\sdelete -z c: It is normally your best option.
A cool alternative is Permadelete. It is an easy to use utility for shredding files and folders permanently.
You can just drag and drop files over the main windows or right click on anything and select Send To from the contextual menu, and then click on Permadelete.

Permadelete
To delete a file, you need to empty the Trash on your Mac. To empty your Trash, right-click on the Trash icon in the dock and select the Empty Trash option. To delete a file or folder, bypassing the Trash, press Option + Command + Delete.
To permanently delete a file, type in the following command:
rm -P /Users/yourUserName/Desktop/deleteMeSecurely.txt # If it is a long file name or a long path, you can also drag and drop the file from finder to your terminal.
-P is an option to overwrite regular files before deleting them. By default, files are overwritten three times.
Another option is Permanent Eraser. It overwrites your data multiple times, scrambles the original file name, and truncates the file size to nothing before Permanent Eraser finally unlinks it from the system.
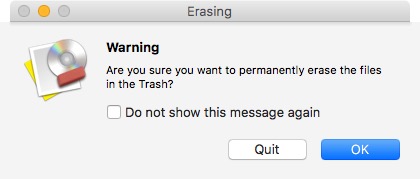
Download the Permanent Eraser app from it website, install it on your Mac, and launch it. A window will pop up asking you if you are sure about permanently erasing the files in the Trash. Smash the OK button and it will securely and permanently delete all your files and folders from the Trash bin. Tick the Do not show this message again checkbox so you will not see this dialog and be bothered by this warning next time you empty your trash.
Permanent Eraser
If you are a GNU/Linux user, you can use shred. It is an utility that overwrites a file to hide its contents and optionally delete it.
To delete securely a file, type in your terminal: shred -uvz mySecrets where u indicates to remove a file after overwriting, v (verbose) to show progress, and finally the z option is to perform a final overwrite with zeroes.
To set the number of overwrite passes, open the terminal and type in: shred -uvz -n 3 mySecrets; The -n option indicates to overwrite n times. To remove multiple files, the command is as follows, shred -uvz -n 5 *.txt or shred -uvz -n 5 *.*
Other options are secure-delete (sudo apt-get install secure-delete -Ubuntu-; yay -S secure-delete -Arch- srm mySecrets or srm -rvz mySecretFolder where r removes a directory, z wipes the last write with zeros, and v enables verbose mode) and wipe (sudo apt-get install wipe -Ubuntu-; sudo pacman -S wipe -Arch-; wipe mySecrets or wipe -rfi mySecretFolder where r tells the utility to wipe recursively a directory; i is to show progress of the process; and f enables forced deletion, without asking), but these tools are not such a good idea on solid state drives (SSDs).
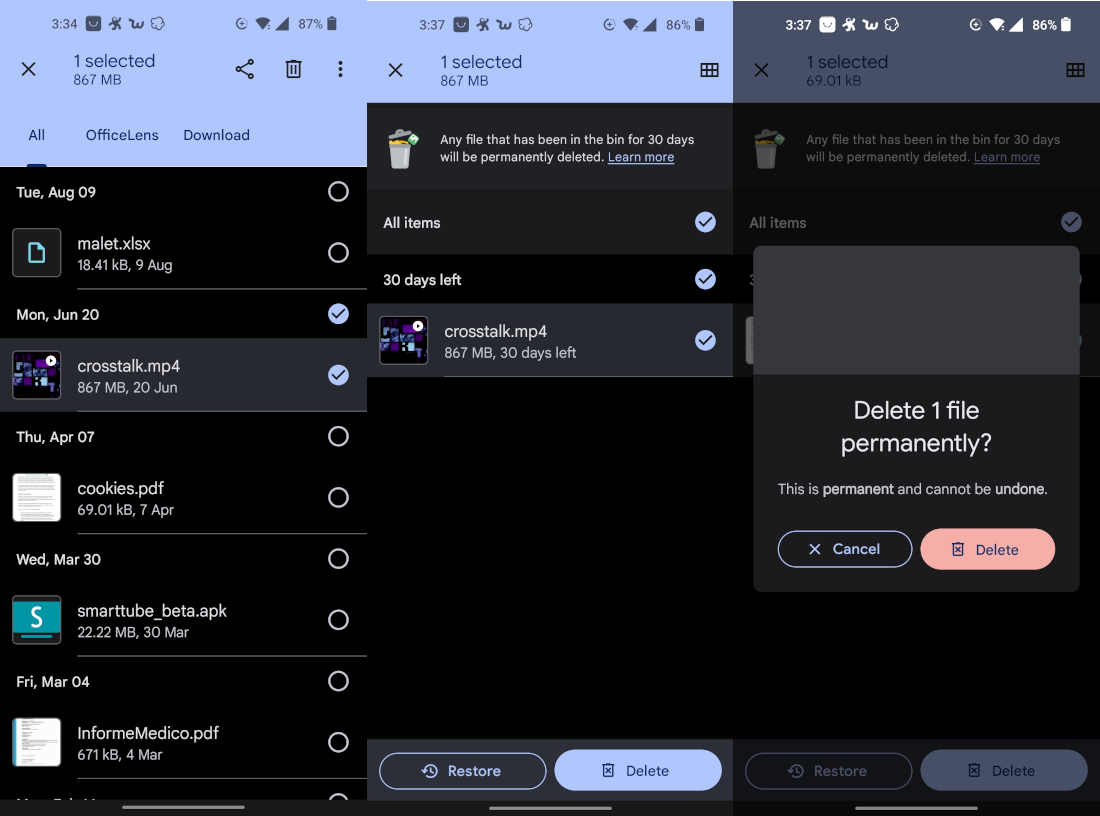
Since Android 6, all Android phones are encrypted by default, so open Files/My Files, select the items you want to delete, and tap the trash button. Delete files will be sent to the bin. It is necessary to manually delete files from the bin when you want to permanently remove them instantly, instead of waiting for them to be deleted after a month.
Delete Android files
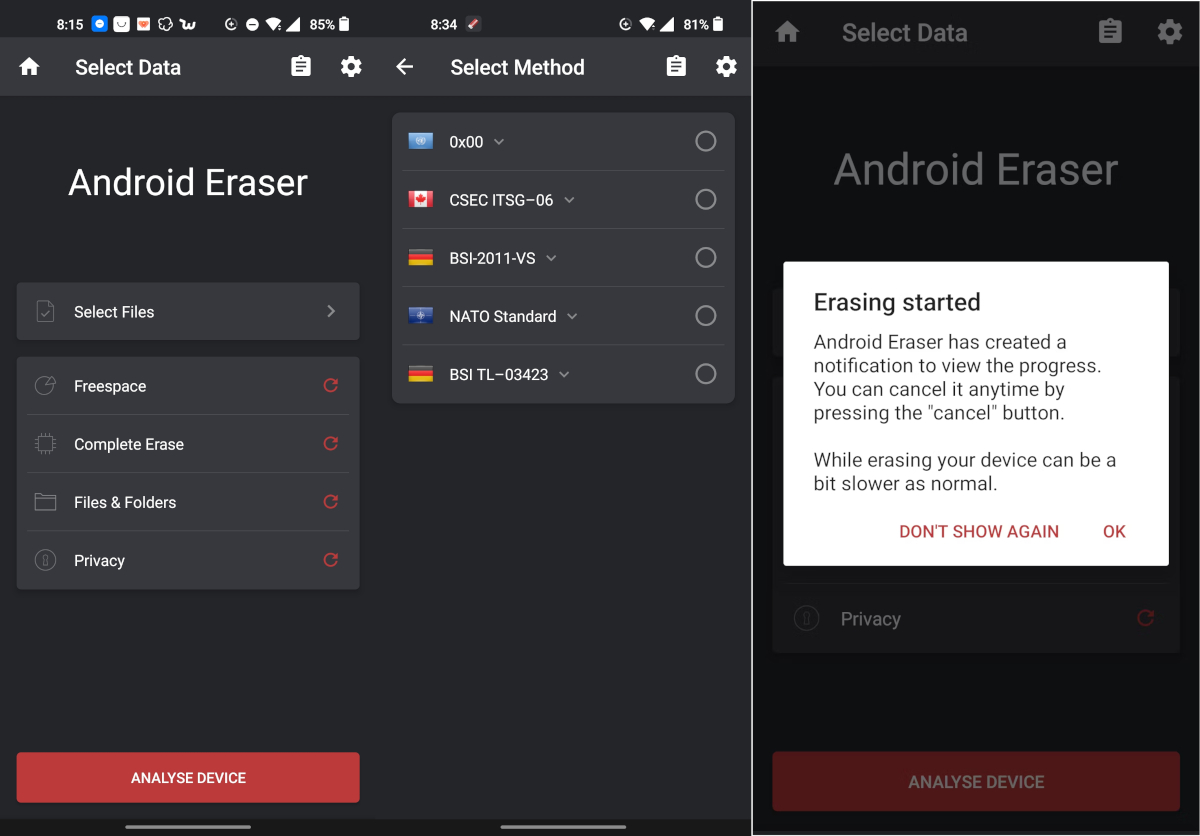
If your phone’s encryption is not enough for you, you should consider installing and using a file shredder like Data Eraser cb or iShredder to securely wipe your data. Tap Freeespace on the home screen, select Internal Storage and tap Continue, then choose a shredding algorithm (you can decide how many times your data is overwritten with random characters), e.g., NATO Standard or BSU TL-0342 are good choices. Next, confirm that you want to proceed and wait patiently till the process is complete. The free Data Eraser limits shredding to a total of 100 MB per day.
Data Eraser cb
The most secure and drastic way to permanently delete private and sensitive files from your smartphone is to restore your phone to factory settings. New Android smartphones are encrypted by default, so your data can not be recovered after a factory reset: Settings, System, Reset options/Backup and reset, Erase all data (factory reset)/Reset phone, tap the Delete/Erase all data, enter your PIN, and click Continue, Erase all Data.
To delete files from your SD card, go to Settings, Storage, SD card and delete your files. It’s worth noticing that encryption is not enabled by default on external storage like microSD cards, so you will need to set it up under Settings, Security. To completely wipe your SD’s content and make its completely unrecoverable, you could format the card by tapping the three-dot menu in the top-right corner, Storage settings, Format, Format SD card/Erase & Format.
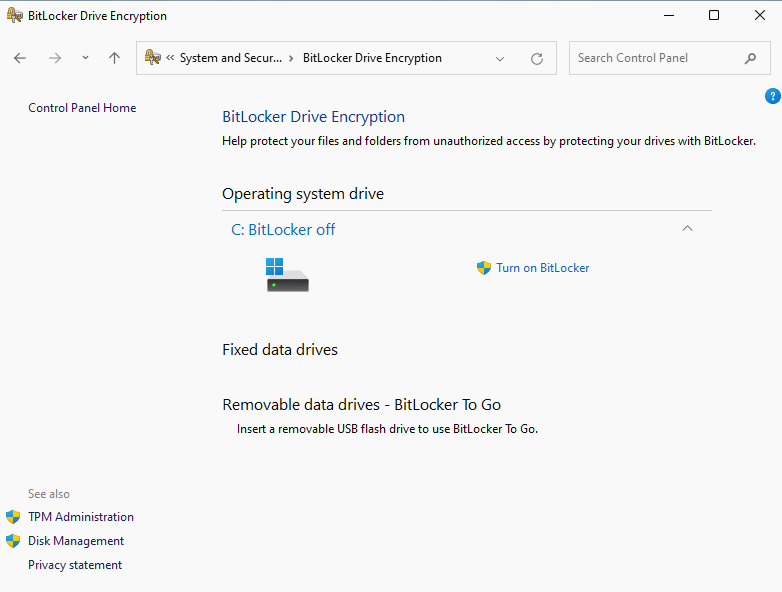
Most new computers come with the solid state drives SSDs instead of the old spinning hard disk drives, one of the best options to securely delete your files and folders is to encrypt your computer with File Vault (macOS), BitLocker (Windows 10/11) or VeraCrypt. When deleting a file on a computer where full-drive encryption is enabled, the deleted file data will remain encrypted, and even if someone is able to recover those files, their data will remain impossible to read.
To enable BitLocker encryption (it is not available in Window’s home edition 😠), search for Control Panel, click on System and Security, BitLocker Drive Encryption, and smash the Turn on BitLocker option.
To enable FileVault, go to System Preferences, Security & Privacy, and choose the FileVault tab. Click the lock at the left bottom, enter your password, and click Turn on FileVault… to enable this feature. Select Create a recovery key and do not use my iCloud account.
After encryption, boot with a Windows 10/11 installation media, a Linux Live CD/DVD or USB, delete all the partitions and format the drive, and your data will be completely unrecoverable.
To reset the SSD to its initial step (a good knowledge of GNU/Linux is required), another option is to do as follows:
# Boot the computer from a Linux USB drive, then find the drive that you want to secure erase.
fdisk -l
# Make sure the drive is not frozen. In the security section of the output it should say "not frozen". Otherwise, put the computer to sleep for a few seconds (echo -n mem > /sys/power/state), and wake it up and check to see if the drive is no longer in a frozen state
hdparm -I /dev/sdX | grep frozen
hdparm --user-master u --security-set-pass PasSWorD /dev/sdX # Enable security by setting a temporary password in order to issue the secure erase command.
hdparm --user-master u --security-erase PasSWorD /dev/sdX # Issue the secure erase command.
Credits: Arch Wiki, Solid state drive/Memory cell clearing and GROK Knowledge Base, Advanced: Erasing SATA Drives by using the Linux hdparm Utility.

JustToThePoint Copyright © 2011 - 2024 Anawim. ALL RIGHTS RESERVED. Bilingual e-books, articles, and videos to help your child and your entire family succeed, develop a healthy lifestyle, and have a lot of fun. Social Issues, Join us.
This website uses cookies to improve your navigation experience.
By continuing, you are consenting to our use of cookies, in accordance with our Cookies Policy and Website Terms and Conditions of use.