Computers are good at following instructions, but not at reading your mind, Donald Knuth
Ubuntu is a free, stable, user-friendly, and very popular operating system. More technically, it is a Debian-based GNU/Linux distribution. Let me share some ideas about what you could do after installing Ubuntu:
Once you have connected your Ubuntu to Google: A. Click on the Day/Time entry in the top bar, the Calendar popup will appear, it should display your Google Calendar events. B. Evolution (sudo apt-get install evolution): Open Evolution and check your gmail, calendar, and contacts. C Access your Google Drive: Files, myEmail@gmail.com.
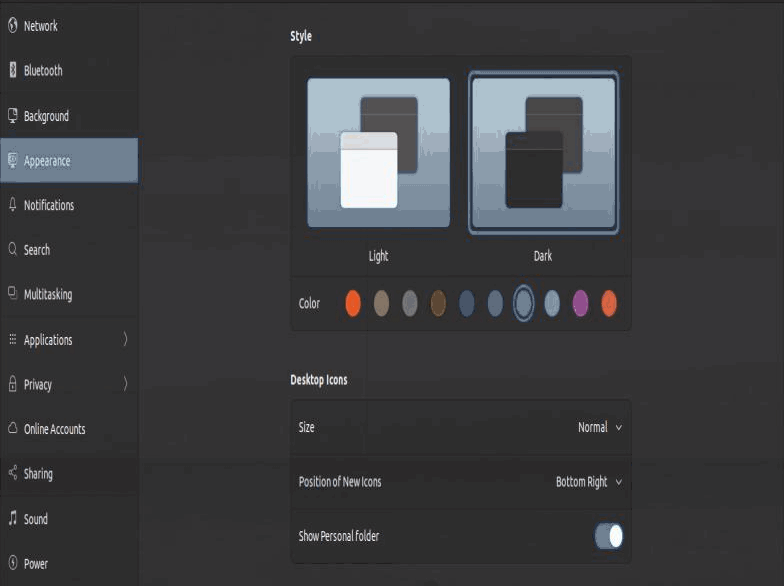
- Customize Ubuntu: Settings, Appearance (Light/Dark; give your Ubuntu a new color; Dock: Auto-hide the Dock, but disable Panel mode and maybe place it on the button like macOS). Ubuntu Tweak is a tool that makes it easy to configure your system and desktop settings, e.g., to get the minimize and maximize buttons, go to Windows Titlebar, enable Maximize and Minimize (a command-line alternative is gsettings set org.gnome.desktop.wm.preferences button-layout “:minimize,maximize,close”).
Installation: sudo apt install gnome-tweaks dconf-editor gnome-weather gnome-shell-extensions gnome-shell-extension-manager.
A GNOME Shell Extension is basically software that enhances the capability of GNOME desktop. Launch Chrome, visit the URL https://extensions.gnome.org/, then click on Click here to install browser extension. It will direct you towards the Chrome web store to install the GNOME Shell integration extension, just smash the Add to Chrome button.
Some cool extensions are:
- Burn My Window: it destroys your windows with style.
- Clipboard Indicator: it adds a clipboard indicator to the top panel and caches clipboard history.
- ArcMenu: it is an application menu for GNOME Shell.
- Vital: it is a monitoring tool that tracks and displays information about your system.
- OpenWeather: it displays weather information for any location.
- Surf: it lets you browse the web directly from the shell.
- User themes. Create two directories in your home directory: .themes and .icons. Download your themes and icons from GNOME-LOOK.ORG and put them in those recently created directories. Open Ubuntu Tweaks, Appearance, change your Icons and Shells.
- Improved Workspace indicator. It provides a workspace indicator similar to i3.
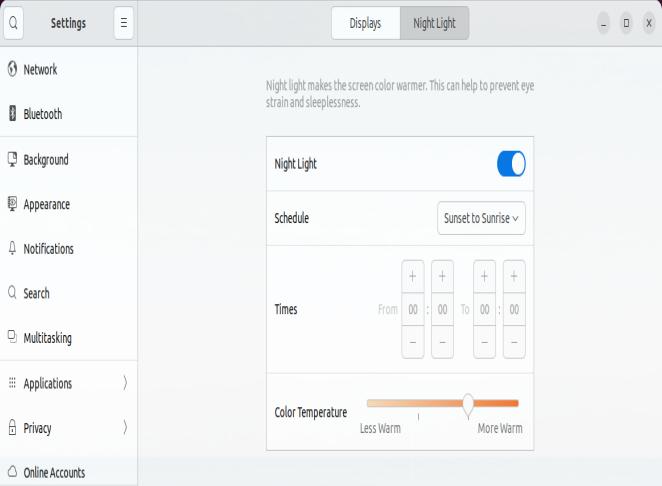
- Enable the night light feature to reduce eye strain at night. Go to Settings, Displays, select the Night Light tab, and enable Night Light.
- Productivity: To snap a windows to the side of the screen, grab its titlebar and drag it to the left or right side until half of the screen is highlighted. If you want to use keyboard shortcuts, hold down Super (Windows) and press the Left or Right arrow key.
Besides, you can add more workspaces (Setting, Multitasking, Fixed Number of Workspaces; Number of Workspaces: 4). To move between your workspaces, press Ctrl + Alt + Arrow keys. Learn and create new shortcuts: System, Keyboard, View and Customize Shortcuts, Custom Shortcuts, +: Name (terminal), Command (gnome-terminal), and Shortcut (Ctr + Alt + T).
If you want a more tiling window management experience, try Material Shell, Pop!_OS, or i3/Awesome.
-
Install extra codecs, Java, Microsoft Web fonts, rar, 7zip support, vlc, and Gimp.
sudo apt install openjdk-11-jre unrar rar p7zip-full ubuntu-restricted-extras vlc gimp
-
Install proprietary hardware drivers: Software & Updates, Additional Drivers. You can also install it on the command line. We can detect the model and the recommended driver by typing: (this is the ouput of my Nvidia graphic card)
user@pc:~$ ubuntu-drivers devices
WARNING:root:_pkg_get_support nvidia-driver-390: package has invalid Support Legacyheader, cannot determine support level
== /sys/devices/pci0000:00/0000:00:01.0/0000:01:00.0 ==
modalias : pci:v000010DEd00001C03sv00001458sd00003718bc03sc00i00
vendor   : NVIDIA Corporation
model    : GP106 [GeForce GTX 1060 6GB]
driver   : nvidia-driver-465 - distro non-free
driver   : nvidia-driver-460-server - distro non-free
driver   : nvidia-driver-450-server - distro non-free
driver   : nvidia-driver-418-server - distro non-free
driver   : nvidia-driver-390 - distro non-free
driver   : nvidia-driver-460 - distro non-free recommended
driver   : xserver-xorg-video-nouveau - distro free builtin
If you agree with the recommendation, install the recommended driver (sudo ubuntu-drivers autoinstall) or install a desired driver (sudo apt install nvidia-driver-390) and reboot (sudo reboot).
-
Enable Flatpak Support. Open your terminal and run the following command:
sudo apt install gnome-software gnome-software-plugin-flatpak flatpak # The Flatpak plugin for the Software app makes it possible to install apps without needing the command line.
flatpak remote-add --if-not-exists flathub https://flathub.org/repo/flathub.flatpakrepo # Add the Flathub repository
flatpak install flathub com.discordapp.Discord # Install Discord.
Then, launch your favorite browser, go to Flathub, find an app you want to install, and click the Install button. It will open the GNOME Software application that will take care of the rest.
-
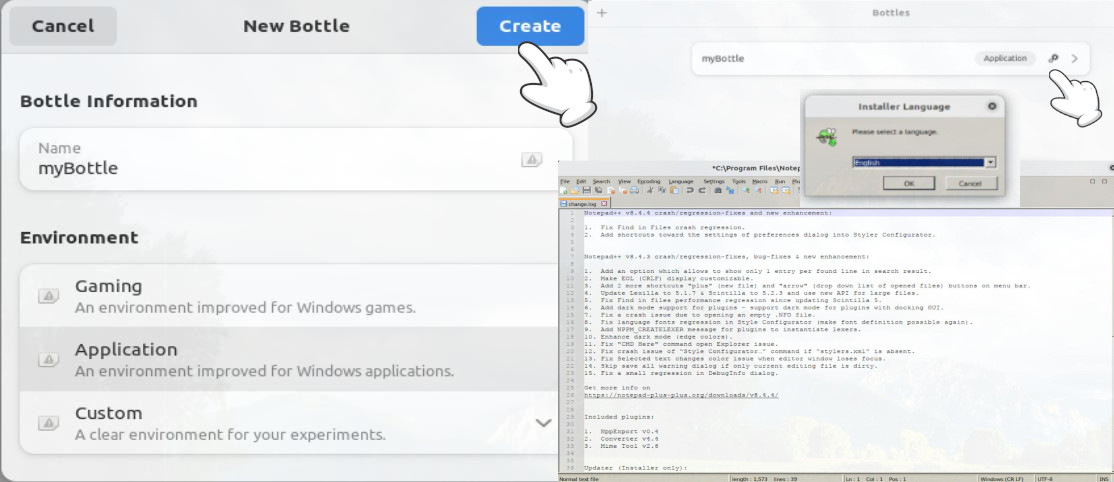
Run your Windows Applications on Linux using Bottles. Bottles is free and open source software that uses environments to help you easily manage and run Windows apps on Linux.
- Installation: flatpak install flathub com.usebottles.bottles -y. You need to have already enabled Flatpak support.
- Launch it: Activities, Show Applications, Bottles.
- Tap on Create a new Bottle and it will begin to download and install required dependencies and libraries. Next, give it a name (e.g., myBottle), and then select the Environment (Gaming, Application or Custom) according to the type of Windows program you want to run, and finally tap on Create.
- Click on your recently created Bottle and then tap on Run. Select the executable of the Windows application (e.g., Notepad++) and the program will start installing, and immediately run afterward.
- Enable minimize on click for the dock icons
gsettings set org.gnome.shell.extensions.dash-to-dock click-action 'minimize'
- Enable Do not disturb mode. Just click on the message tray in the top middle and toggle the Do not disturb button.
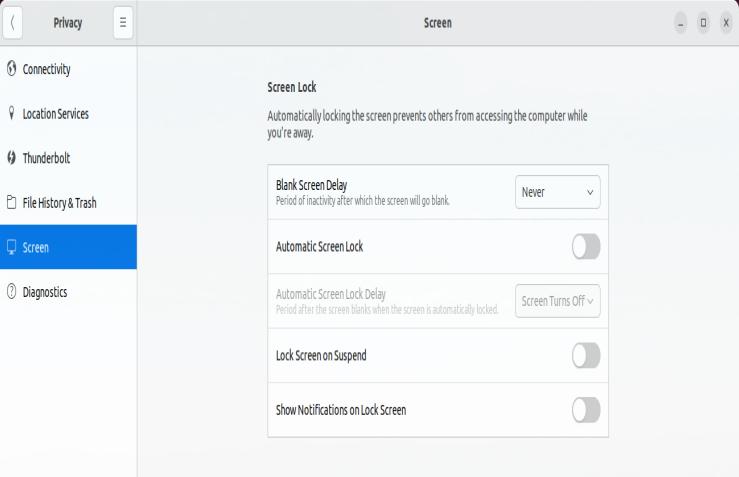
- Disable lock screen: Settings, Privacy, Screen, Blank Screen delay (Never); then disable Automatic Screen Lock and Lock Screen on Suspend.
- Plank is a simple and lightweight dock. Install: sudo add-apt-repository ppa:ricotz/docky. sudo apt-get update. sudo apt-get install plank. Configure it: plank ‐‐preferences, Appearances (Icon Size; IconZoom: 200), Docklets (Applications, Desktop). If you install Plank, you may want to remove Ubuntu’s default dock: sudo apt remove gnome-shell-extension-ubuntu-dock. Dash to Dock (a GNOME extension) and Cairo are two alternatives.
- Wallch and Variety are automatic wallpaper changers for Linux: sudo apt install wallch variety
- Remove Apport. This is the reporting system for crashes and failures in Ubuntu: sudo apt remove apport-gtk
- Improve performance with preload. It is a daemon application that monitors and analyzes users behavior, predicts what applications users might run, and fetches those applications into memory for faster startup times: sudo apt install preload
- WebApps: First, you need to install a specific library, sudo apt install libfuse2. Webapp Manager. allow you to run web applications as if they were local apps.
AppImageLauncher integrates AppImages to the application launcher.
- Download the app from AppImageHub or App Outlet (a Universal application store). Save it in a directory AppImages (mkdir ~/AppImages) in your home folder.
- Right-click on the file and select Open with Other Application/Open with AppImageLauncher. Finally, click tap on OK. From now on, you can bring up the Applications menu, enter its name, and launch it from there.

- Besides, you can just use the terminal by making your AppImages executable (cdmod a+x myAppImage) and launching them by typing ./myAppImage
- Anbox is a container-based approach for running Android on GNU/Linux.
- Install Anbox and the Android Debug Bridge (ADB): snap install ‐‐devmode ‐‐beta anbox, sudo apt install android-tools-adb. If the Anbox container is not running yet, you can start it now: anbox.appmgr.
- Google Play Store: sudo apt install wget lzip unzip squashfs-tools (some required dependencies). wget https://raw.githubusercontent.com/geeks-r-us/anbox-playstore-installer/master/install-playstore.sh, chmod +x install-playstore.sh, sudo ./install-playstore.sh. Enable all the permissions for both Google Play Store and Google Play Services: anbox.appmgr, Settings, Apps, Google Play Services, Permissions.
- Connectivity problems? Try sudo /snap/anbox/current/bin/anbox-bridge.sh (re)start
Firewall
Ufw stands for uncomplicated firewall
- Installation: sudo apt install ufw
- Basic usage. Enable/Disable ufw: sudo ufw enable/disable
- Reload ufw: sudo ufw reload
- Check the current sate of UFW. If it is active, it shows a list of rules: sudo ufw status verbose
- Allow ssh (sudo ufw allow ssh/tcp), Barrier (sudo ufw allow 24800), NFS (sudo ufw allow from [client IP address or local network] to any port nfs).
- Allow Synching: sudo ufw allow synching synching-gui
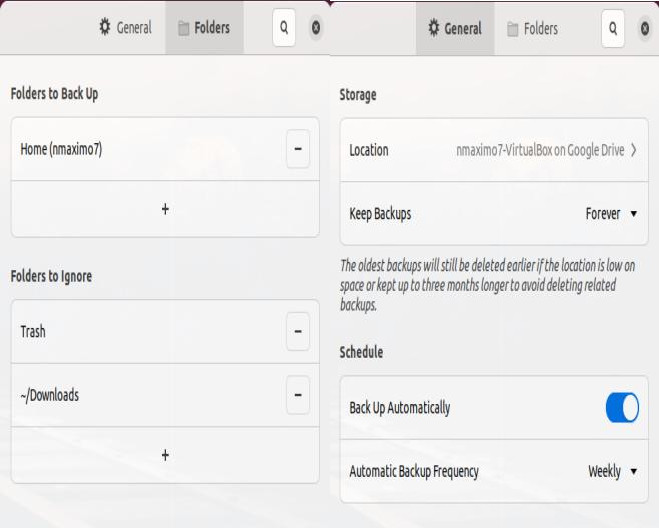
Backing Up with Déjà Dup
Déjà Dup is a simple backup tool. It hides the complexity of backing up and uses duplicity as the backend.
- Installation. Ubuntu: sudo apt install deja-dup. Arch: pacman -S deja-dup.
- Launch it and tap on Create My First Backup.
- Next, you need to choose the folder/s that you want to back up and the ones that you want to ignore. By default, it backups your entire home directory and the Downloads folder is not included in the backup.
- Finally, you need to define where you want to backup your data (Storage Location: Google Drive, Local Folder, or Network Folder), a Folder you’d like to store it; and a Schedule: enable Back Up Automatically and choose Automatic Backup Frequency to be daily or weekly.
Timeshift
Timeshift is an open-source powerful backup tool similar to the Time Machine in Mac OS.
- Installation: sudo apt install timeshift.
- Launch Timeshift.
- RSYNC. This is the first step; you have to choose what type of snapshots you are going to use.
- Snapshot Location. You need to select the place in which Timeshift will save the snapshots. Ideally, you should save the snapshots in a dedicated disk or a different partition, perhaps one setup solely for storing the snapshots e.g., sdb1, my external hard drive formatted in ext4.
- Snapshot Levels. You need to define when to take snapshots and also how many snapshots will be kept.
- User Home Directories. User data is excluded by default, but you can change this setting: Include All.
- To restore a snapshot, open Timeshift, click on the snapshot you’d like to restore, and click on the Restore button. Next, select a target drive where you’d like to restore the snapshot. Timeshift will perform a “Dry Run” to test the snapshot, confirm by clicking on Next, agree to the disclaimer and just pray 😄.