|
 |
 |
|
 |
|
|
|
|
|
|
SEO stands for “search engine optimization.” It is about helping search engines understand and present your content. “In order to improve your online visibility, you will need to carry out SEO (search engine optimization) practices,” Search Engine Watch.
SEO is an endless task that takes a lot of effort and time on a regular basis, an endless expansion of discovery.
Settings, Permalink, Post name, https://www.justtothepoint.com/sample-post/.
<?php
/**
* The template for displaying the header
*
* Displays all of the head elements and everything up until the "site-content" div.
*
* @package WordPress
* @subpackage JustToThePoint
* @since JustToThePoint 1.0
*/
?><!DOCTYPE html>
<html <?php language_attributes(); ?> class="no-js"> // Displays the language attributes for the ‘html’ tag.
<head>
<title><?php wp_title(); ?></title> // Title tag, the page's headline.
<! –– Adding MetaTags ––>
<meta charset="<?php bloginfo( 'charset' ); ?>">
<meta name="viewport" content="width=device-width, initial-scale=1"> // Let us take control over the viewport, i.e., the user's visible area of our page.
<link rel="profile" href="http://gmpg.org/xfn/11">
<link rel="icon" type="image/x-icon" href="https://www.justtothepoint.com/favicon.ico" /> // A favicon is a small picture that helps your visitors to recognize your WordPress site.
<link rel="shortcut icon" type="image/x-icon" href="https://www.justtothepoint.com/favicon.ico" />
<?php if ( is_singular() && pings_open( get_queried_object() ) ) : ?>
<link rel="pingback" href="<?php bloginfo( 'pingback_url' ); ?>">
<?php endif; ?>
<meta name="google-site-verification" content="Your Google Code Is Here" /> // It verifies your ownership of a site.
Before Google lets you add your site or submit its sitemap, it asks you to verify your site ownership: 1. Google Search Console. 2. Add property, and type your website's url. 3. Download the Verification File and upload it to the root folder of your website.
<meta name="msvalidate.01" content="Your Bing Code Is Here" /> // Bing Meta tag verification. 1. Bing webmaster tools. 2. Copy your verification Code (BingSiteAuth.xml).
<meta name="p:domain_verify" content="Your Pinterest Code Is Here" /> // Pinterest Verification Code.
<meta name="yandex-verification" content="Your Yandex Code Is Here" /> // Yandex is a popular search engine in Russia.
<meta property="og:site_name" content="JustToThePoint" />
<meta property="article:author" content="https://www.facebook.com/nmaximo7" />
“The Open Graph protocol enables any web page to become a rich object in a social graph. To turn your web pages into graph objects, you need to add basic metadata to your page,” ogp.me.
<meta property="og:site_name" content="JustToThePoint" />
<meta property="og:image" content="<?php echo get_the_post_thumbnail_url( get_the_ID(), 'large' ); ?>" />
<meta property="og:type" content="article" />
<meta property="og:site_name" content="JustToThePoint" />
<meta property="og:type" content="article" />
<meta property="og:locale" content="en_US" />
<meta property="article:publisher" content="https://www.facebook.com/nmaximo7" />
<meta property="article:author" content="https://www.facebook.com/nmaximo7" />
<meta property="og:url" content="<?php echo 'https://' . $_SERVER['HTTP_HOST'] . $_SERVER['REQUEST_URI']; ?>" />
<!-- Twitter Cards Meta Tags For WordPress --> "With Twitter Cards, you can attach rich photos, videos and media experiences to Tweets, helping to drive traffic to your website," Twitter's Developer Platform.
<meta name="twitter:card" content="summary_large_image" />
<meta name="twitter:site" content="@justtothepoint" />
<meta name="twitter:creator" content="@justtothepoint" />
<meta name="twitter:domain" content="<?php bloginfo('url'); ?>" />
<meta name="twitter:image" content="<?php echo get_the_post_thumbnail_url( get_the_ID(), 'large' ); ?>" />
<meta name="twitter:url" content="<?php echo 'https://' . $_SERVER['HTTP_HOST'] . $_SERVER['REQUEST_URI']; ?>" />
<meta name="twitter:title" content="<?php wp_title(); ?>" />
<?php wp_head(); ?> (*)
Next, let’s add a function on functions.php that is triggered by this very last line (*):
/**
* Adding MetaTags to our WordPress posts and pages.
*/
function add_custom_meta(){
echo "<!-- Adding Description and KeyWords -->\n";
#Homepage Meta Description and Keywords
if( is_home() || is_front_page() ){
$meta_des = "JustToThePoint makes the reading experience fun for your child and your entire family. These are funny, easy to read, and educational ebooks for kids and teenagers. A delightful and unforgettable way for kids to learn and enjoy reading.";
echo '<meta name="description" content="' . $meta_des . '" />';
echo '<meta name="twitter:description" content="' . $meta_des . '" />';
echo "\r\n<br>";
$meta_key = "read,reading,ebook,bilingual,reading books,reading child,children books,online books,e-books,reading books online,free books,e-books to read,free books for all,free ebooks,read online,free ebook,martha and the twins,read marta and the twins,reading free ebook,free online ebook marta and the twins,children books,learning to read,encourage reading,reading comprehension,fictional books,non fictional books,enjoy reading,reading for free,bilingual ebooks,educational ebooks";
echo '<meta name="keywords" content="' . $meta_key . '" />';
echo "\r\n<br>";
echo "<!-- My End SEO -->\n";
}
WordPress has the ability to allow authors to assign custom fields to a post. By default, they are hidden, so you need to click on the three-dot menu at the top-right corner, select Options, check the “Custom fields”, and click on the “Enable & Reload” button.
After that, the post editor will reload, and you will be able to see the custom fields panel, just below the content editor. Finally, create and edit appropriately two custom fields: description and keywords.
#Single Page Meta Description and keywords
if( is_single() || is_page() ){
$des = get_post_meta( get_the_id(), 'description', true); // get_post_meta returns the value of the meta key ('description') for the given post id. get_the_ID() returns the ID of the current item in the WordPress Loop, i.e., the current post or page.
if( ! empty( $des ) ){
$meta_des = esc_html($des); // If description is not empty, it is passed to esc_html() to be stripped of invalid or special characters for output in HTML.
echo '. $meta_des . '" />';
echo '. $meta_des . '" />';
}
$key = get_post_meta( get_the_id(), 'keywords', true);
if( ! empty( $key ) ){
$meta_key = esc_html($key);
echo '. $meta_key . '" />';
}
}}
add_action( 'wp_head', 'add_custom_meta', 4 ); // The wp_head action hook is triggered by the wp_head() function in the theme's header.php.
You can use a plugin: All in One SEO, Yoast SEO, or XML Sitemaps.
The last plugin, XML Sitemaps, is a free one for generating a sitemap or you can do it manually by editing functions.php:
// Credits: AIOSEO.com, How to Create a WordPress XML Sitemap Without a Plugin by Stina Pettersson; medium.com, How to create sitemap in WordPress without plugin by Rohit Gilbile; wplift.com, How to Create a Sitemap in WordPress Without a Plugin (2021).
/* function to create sitemap.xml file in root directory of site */
function xml_sitemap() {
$postsForSitemap = get_posts(array( // First, we get an array of all the posts and pages.
'numberposts' => -1,
'orderby' => 'modified',
'post_type' => array('post','page'),
'order' => 'DESC'
));
$sitemap = '<?xml version="1.0" encoding="UTF-8"?>';
// <?xml version="1.0" encoding="UTF-8"?> It encodes the file sitemap.xml using UTF-8 encoding.
$sitemap .= '<urlset xmlns="http://www.sitemaps.org/schemas/sitemap/0.9">';
// <urlset xmlns="http://www.sitemaps.org/schemas/sitemap/0.9">
foreach($postsForSitemap as $post) { // Let's iterate for each post or page.
setup_postdata($post); // setup_postdata() fills the global variables $id, $authordata, $page, $pages, etc.
$postdate = explode(" ", $post->post_modified); // $post->post_modified is the date and time of the last modification of the post or page. explode returns an array of strings, each of which is substring of $post->post_modified.
$sitemap .= '<url>'.
'<loc>'. get_permalink($post->ID) .'</loc>'.
// get_permalink returns the full permalink for the post ID: <loc>https://www.justtothepoint.com/en/javascript-and-wordpress/</loc>
'<lastmod>'. $postdate[0] .'</lastmod>'.
// <lastmod>2022-03-27</lastmod> Note: Google uses the <lastmod> value if it's consistently and verifiably (for example by comparing to the last modification of the page) accurate.
'<priority>1</priority>'.
//<priority>1</priority>
'<changefreq>daily</changefreq>'.
//<changefreq>daily</changefreq>
It is worth the try, but Google ignores priority and changefreq values.
'</url>';
}
$sitemap .= '</urlset>';
$fp = fopen(ABSPATH . "sitemap.xml", 'w'); // ABSPATH is the root path of Wordpress, so it will write the XML sitemap (sitemap.xml) there.
fwrite($fp, $sitemap);
fclose($fp);
}
add_action("publish_post", "xml_sitemap"); // Our function will be fired when a post or page is published.
add_action("publish_page", "xml_sitemap");
# Sitemap URL Status Code Checker. Inspired by PEMAVOR.com, Python Status Code Checker for XML-Sitemap
# Enter your XML Sitemap
sitemapLocal = "http://localhost:1313/sitemap.xml"
sitemapServer = "https://justtothepoint.com/sitemap.xml"
SLEEP = 1.0 # Time in seconds the script should wait between requests
import advertools as adv
import pandas as pd
import requests
import time
import warnings
warnings.filterwarnings("ignore")
def getStatuscode(url):
try:
r = requests.head(url,verify=False,timeout=25, allow_redirects=False)
# It is faster to only request the header, so we make a HEAD request to a web page, and returns the HTTP headers
# verify = False, we don't want to verify the servers TLS certificate.
# timeout=25. It defines how many seconds to wait for the client to make a connection and/or send a response.
# allow_redirects=False: It disable redirection handling with the allow_redirects paramenter.
# r = requests.get('http://github.com/', allow_redirects=False). r.status_code is 301 because GitHub redirects all HTTP requests to HTTPS.
return (r.status_code)
except:
return -1
def pull_allURL_sitemap(SLEEP, local):
# It gets all urls from sitemap
print("Start scraping sitemap urls")
# It turns the web site's sitemap into a dataframe
if local:
sitemap = adv.sitemap_to_df(sitemapLocal)
else:
sitemap = adv.sitemap_to_df(sitemapServer)
# dropna removes missing values. subset defines in which columns to look for missing values.
# reset_index reset the index of the DataFrame, and use the default one instead.
# The old index is added as a column, and a new sequential index is used.
# Check Pandas documentation, https://pandas.pydata.org/docs/index.html
sitemap = sitemap.dropna(subset=["loc"]).reset_index(drop=True)
# We need only one column which is the "loc"
url_list=list(sitemap['loc'].unique())
return url_list
print("All sitemap urls have been scraped")
def sitemap_status_code_checker(url_list):
print("Checking status code")
# Loop over full list
for url in url_list:
myStatus = str(getStatuscode(url))
if myStatus != "200":
print(url + " : " + myStatus + ".")
time.sleep(SLEEP)
if __name__ == '__main__':
url_list = pull_allURL_sitemap(SLEEP, True)
sitemap_status_code_checker(url_list)
Broken Link Checker is a plugin that monitors and tests all internal links & external links on your site looking for broken links. Install, activate it, and then go to Tools, Broken Links to view a full report with your broken links. Keep it active on your website until you fix all your broken links. Then, deactivate it because it will slow down your WordPress.
Google Search Console is a free service that helps you monitor, maintain, and troubleshoot your site and SEO. Log in to Google Search Console, click on the Coverage link, and you will find your broken links (404 errors) either under Errors or Excluded tabs.
Fix your broken links by using All in One SEO (-a non-free plugin- Redirects, and click on the Activate Redirects button), Redirection (WordPress dashboard, Tools, Redirection), Page Links to (It redirects a post or a page to another URL), or editing the .htaccess web server configuration file (add content at the end of this file):
RewriteEngine On
RewriteBase /
Redirect 301 /en/the-wizards-apprentices-ii/ /en/library/the-wizards-apprentices-ii/index.html
Redirect 301 /en/martha-and-the-twins-ii/ /en/library/martha-and-the-twins-ii/index.html
mod_rewrite is an Apache module that allows you to easily redirect URLs in your site.
LoadModule rewrite_module modules/mod_rewrite.so
RewriteEngine On
Redirect 301 /oldDirectoryMypage/ /newDirectoryMyPage/
Credits: IgniteVisibility, The Ultimate List of 301 Redirect Examples for SEO.
Linkchecker is a command-line tool to check for broken links in web sites
#!/bin/sh
echo "-------------------------------------------------------------------------"
echo "Script for checking Links"
echo "-------------------------------------------------------------------------"
echo "check server?"
select yn in "Yes" "No"; do
case $yn in
Yes ) linkchecker https://justtothepoint.com; break;;
No ) linkchecker http://localhost:1313;;
esac
done
exit 0
A more elaborated script:
#!/usr/bin/env bash
# Check all internal links on the dev site
# Script requires linkchecker
if ! [ -x "$(command -v linkchecker)" ]; then
echo "Error: linkchecker is not installed"
exit 1
fi
SITE_URL="http://localhost:1313"
# Wait for the test server to start up
until $(curl --output /dev/null --silent --head --fail $SITE_URL/); do
printf '.'
sleep 1
done
echo "Starting to check all links..."
# -- check-extern: enables checking external links
# --ignore-url=/livereload.js Hugo always tries to load livereload.js from the hardcoded path /livereload.js
# > siteerrors.log redirects the output with the broken links to siteerror.log
linkchecker --ignore-url=/livereload.js \
--check-extern \
$SITE_URL > siteerrors.log
SEO requires a fast, reliable, and mobile-friendly website.
Check your website and hosting server speed (GTmetrix, PageSpeed Insights). Choose one hosting service that provides faster load time for the websites on its server. A VPS or a dedicated server are the best options to improve your website loading speed.
Reduce your plugins and addons and delete the ones that are not necessary.
Update WordPress’s core, its themes and plugins, and your site’s PHP version.
Use a lightweight theme or framework.
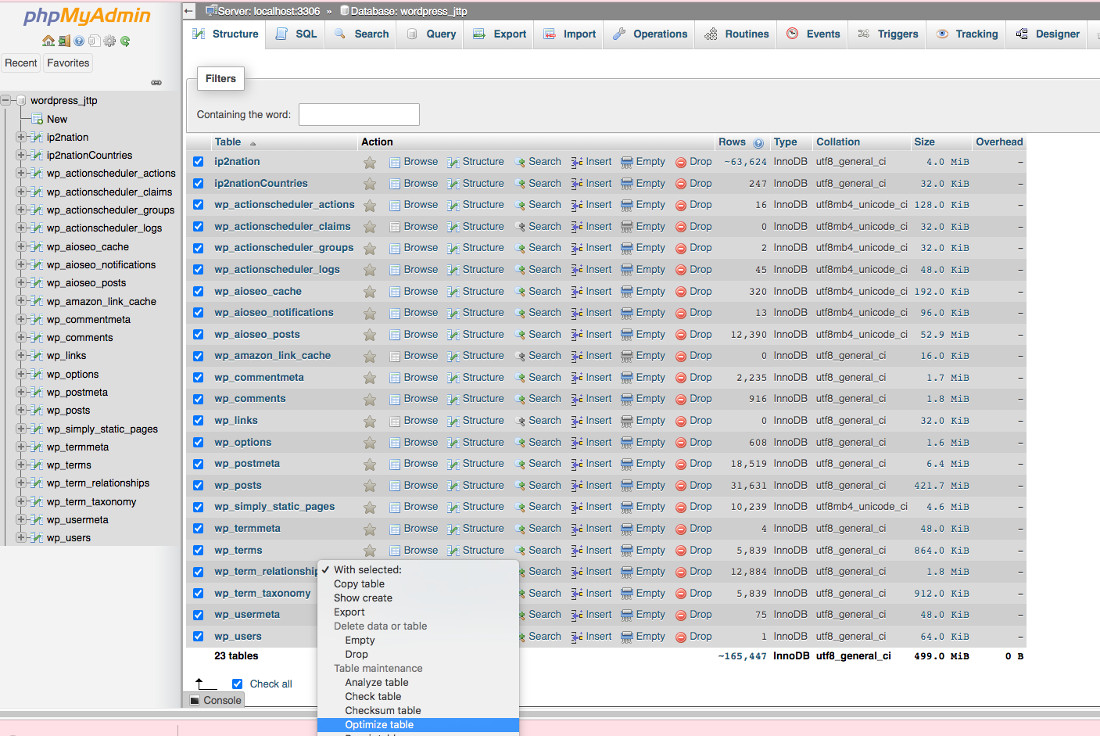
Clean up your WordPress’ database. A bloated database can slow your website down or even crash it. Of course, you can use a plugin (WP-Optimize, WP-DBManager) or do it manually: hosting control panel, phpMyAdmin, tick the “check all” box on the bottom and choose “Optimize table” from the dropdown menu next to it. Finally, click on the “Go” button.
WP-Optimize is a non-free all-in-one solution: A. WP-Optimize, Database, and click on “Run all selected optimizations”. B. WP-Optimize, Images. Turn on “Automatically compress newly-added images”, and select Compression options, Prioritize retention of detail (a compromise between image’s size and image’s quality), then “Select all”, and click on the “Compress the selected images” button.
C. Next, let’s set up the cache: WP-Optimize, Cache. Turn on “Enable page caching”. Enable Gzip compression in the “Gzip compression” tab (it compresses the requested resources before sending them to the browser), Enable. Finally, enable the browser static file caching headers settings in the “Static file headers” tab, Enable. It advises a visitor’s browser to cache or save non-changing files so that it does not attempt to retrieve them upon every visit and by doing so, your pages will load faster.
WordPress 5.5 has brought us the native lazy loading of images. It makes images only load as our visitors navigate our pages, avoiding unnecessary consumption and loading delays in the browser.
Miscellaneous settings, Disable caching for logged in visitors. (Recommended) This is important because we don’t want to show cached papes for regular visitors, they deserve to see new content.
Next, we will turn on GZIP compression. This is a cool and easy way of speeding up your WordPress site by compressing files so they transfer faster: WP Super Cache Settings, Advanced, Compress pages so they’re served more quickly to visitors.
Advanced settings, Clear all cache files when a post or page is published or updated. It clears the cache to make sure new content is shown, so you don’t need to clear your browser cache when you publish a new post.
Expiry Time & Garbage Collection setting, Cache Timeout: 3600, i.e., How long should cached pages remain fresh? A good starting point, let’s say a normal WordPress site that does not get a lot of traffic, could be 3600 seconds.
define('IMAGE_EDIT_OVERWRITE', true);
/** By default, WP creates a few images of different dimensions when you edit an image. This line cleans up old image files and keeps only the latest ones.*/
define('WP_CACHE', true);
/** This line should be just above the MySQL settings. Credits: [DeveloperDrive.com](https://www.developerdrive.com/), 16 BEST WP-CONFIG SNIPPETS FOR WORDPRESS.*/
/** The name of the database for WordPress */
define('DB_NAME', 'myDatabase');
/** MySQL database username */
define('DB_USER', 'myUserName'); [...]
define( 'WP_POST_REVISIONS', 3 );
define( ‘WP_ALLOW_REPAIR’, true); /** It allows WordPress to optimize your database automatically.*/
wp-config file is the most important and sensitive file on your Wordpress blog. It is the main configuration file of WordPress, e.g., define (‘WP_DEBUG’, true); -it enables the WordPress debugger-, define(‘EMPTY_TRASH_DAYS’, 30); -it empties your trash automatically every month-, define(‘AUTOSAVE_INTERVAL’, 90); -It autosaves your post and pages every 90 seconds-, etc.
WP Super Cache allows you to cache every published post and page on your site. “It will create supercache static files so unknown visitors (including bots) will hit a cached page. This will probably help your Google ranking as they are using speed as a metric when judging websites now.” WP Super Cache, Preload, Refresh preloaded cache files every 600 minutes, and check “Preload mode (garbage collection disabled. Recommended.)” and “Preload tags, categories, and other taxonomies.” Finally, click on Save Settings, and then hit the “Preload Cache Now” button. A good article can be found in OnlineMediaMaster, The Ideal WP Super Cache Settings With Cloudflare Or BunnyCDN.
There are many layers of cache: the browser cache, the WordPress cache plugin (WP Super Cache), and server-side caching (your hosting server stores a copy of your webpage and then send it to the browser). Clear Cache is one of the best browser plugins for quickly and easily emptying the browser cache.
DELETE a,b,c
FROM wp_posts a
LEFT JOIN wp_term_relationships b
ON (a.ID = b.object_id)
LEFT JOIN wp_postmeta c
ON (a.ID = c.post_id)
WHERE a.post_type = 'revision';
The wp_posts table is where the content of your posts and pages are stored. All posts and pages, and their revisions are stored and available in the wp_posts table. wp_postmeta stores metadata about posts and pages. wp_term_relationship links your posts to the taxonomy terms (taxonomy is a hierarchy of metadata terms) that have been assigned to them. The SQL command “LEFT JOIN” combines records from two tables, so we can remove all post revisions (a.post_type = ‘revision’) from wp_posts and its metadata (wp_postmeta, wp_term_relationship). Credits: evantotus+, Where Are Pages Stored? The WordPress Database
Besides, we can remove the comments’ metadata from WordPress database: hosting control panel, phpMyAdmin, SQL:
DELETE FROM wp_commentmeta WHERE comment_id NOT IN (SELECT comment_id FROM wp_comments);
DELETE FROM wp_commentmeta WHERE meta_key LIKE '%akismet%'; // Askimet is not removing those old data automatically!
The table “wp_comments” stores all WordPress comments on posts and pages. It also contains unapproved comments. The table wp_commentmeta contains metadata about the comments. The SQL command DELETE FROM wp_commentmeta WHERE comment_id NOT IN (SELECT comment_id FROM wp_comments); removes all the rows from wp_commentmeta -comments’ metadata- for comments that do not longer exist.
Non-free plugins: Imagify, ShortPixel Image Optimizer, and Smush. Smush Plugin Setup Wizard: 1. Begin Setup. 2. Automatically optimize new uploads is already checked, so click on Next. 3. Strip my image meta data. 4. Unchecked “Allow usage data tracking” and click on “Finish Setup Wizard”. Then, you are bounced to the Smush dashboard, and click on the “BULK SMUSH NOW”.
Imagify: A. Create an account, then go to API & Integration and copy your API Key and paste it on “2. Enter your API Key”. Next, 3. Configure it. Go to Settings, Optimization Level (Ultra), disable backup original images and keep all EXIF data. Select “Display images in WebP format on the site” and Resize larger images (2048), and click on Save and go to Bulk Optimizer. Finally, hit on IMAGIF’EM ALL, and START THE OPTIMIZATION.
resmush.it is a free Image optimization based on reSmush. Firstly, you need to install and activate it. Secondly, go to the settings dashboard by clicking on Media, reSmush.it in the WordPress admin menu. Finally, click on Optimize all pictures.
Optimizing Images From the Command Line
##!/bin/bash
# Use: ./downloadConvert.sh URL QUALITY (e.g., 90)
# Url containing the image
url="$1"
# Webp image quality
quality="$2"
# Let's get filename and store in $filename variable
file="$(basename $1)" # It removes the directory path and returns the file name
filename="$(basename $1 | sed 's/\(.*\)\..*/\1/')"
# Syntax: sed 's/OldWord/NewWord/', so it is
# A. sed 's/
# B. We need to surround our first \(.*\) match in parenthesis to remember the file name without extension, both parenthesis needs to be escaped. We replay or put it back in the replacement part of the command with the /1.
# C. After that, \. is the "dot", followed by 0 or more characters .*, that is, the extension
# E. / Now, it comes the NewWord
# F. \1 As we said it before, we put it back the filename without extension.
# G. /
echo "Filename without extension : $filename"
wget $url
cwebp $file -q $quality -o ${filename%.*}.webp
##!/bin/bash
# Bash file converter from (png, jpg, and jpeg) to webp.
# Use: bash bashConverter.sh DIRECTORY_CONTAINING_IMAGES QUALITY (e.g., 90)
# Inspired by css-tricks.com, Converting and Optimizing Images From the Command Line
# Directory containing images
input_dir="$1"
# Webp image quality
quality="$2"
# We loop for each png, jpeg, and jpg in the input directory
for img in $( find $input_dir -type f -iname "*.png" -o -iname "*.jpeg" -o -iname "*.jpg" );
do
# Input format can be either PNG, JPEG, or TIFF.
# Syntax: cwebp -q compression_factor input_file -o output_file.webp
cwebp $img -q $quality -o ${img%.*}.webp
done
You can use Jetpack, too but it is not a free plugin. “Jetpack’s Site Accelerator helps your pages load faster by allowing Jetpack to optimize your images and serve them alongside static files (like CSS and JavaScript) from our global network of servers.” Jetpack, Settings, Performance, and toggle on “Enable site accelerator”.
Cloudflare will provide configuration recommendations: enable always use https, enable auto minify, then click “back to overview”. You should also use two-factor authentication.
If you’re on Cloudflare, you can’t FTP to your hostname (ftp.justtothepoint.com), as it’s now being proxied by Cloudflare, and that won’t proxy an FTP connection. You’ll have to FTP directly to your server’s IP address, which is what you have as your A record listed at Cloudflare in your DNS tab.
function add_googleanalytics() {
?>
return '<!-- Google Analytics -->
// Paste your Google Analytics code
'<?php
}
add_action('wp_footer', 'add_googleanalytics');
Prerequisites: Install Git, Node.js, and npm.
Export your WordPress content to XML: Dashboard, Tools, Export.
Convert the WordPress export XML file into Markdown files suitable for Hugo. Use wordpress-export-to-markdown.
cd myNewSite
git clone https://github.com/lonekorean/wordpress-export-to-markdown
Drop your WordPress export file into this directory, and run the script: npm install && node index.js. After the script is done, you will see an output folder with all your posts and pages in Markdown format.

JustToThePoint Copyright © 2011 - 2024 Anawim. ALL RIGHTS RESERVED. Bilingual e-books, articles, and videos to help your child and your entire family succeed, develop a healthy lifestyle, and have a lot of fun. Social Issues, Join us.
This website uses cookies to improve your navigation experience.
By continuing, you are consenting to our use of cookies, in accordance with our Cookies Policy and Website Terms and Conditions of use.