JustToThePoint English Website Version
JustToThePoint en español

How to install, configure, and use Windows Terminal and iTerm

A terminal emulator is a text-only application that emulates a console in a desktop environment. Basically, it is a GUI program that acts as a wrapper or front-end and allows you to run a shell and enter Command ⌘s that the operating system can interpret and execute.

And just as any other program or application, you can install, uninstall, and customize different terminals. There are many great terminals out there such as iTerm, Alacrity, Windows Terminal, Hyper.is, Kitty, guake, and gnome-terminal.

A shell is a command-line interpreter. It sits between the kernel (core) of an operating system and the user, and exposes the operating system’s services to a human user or other programs. In other words, a shell is a command-line user interface for accessing the services of the operating system. Some example of shells are: Power Shell, cmd, Bash, fish, and Zsh. Terminals 

Spice your Windows terminal

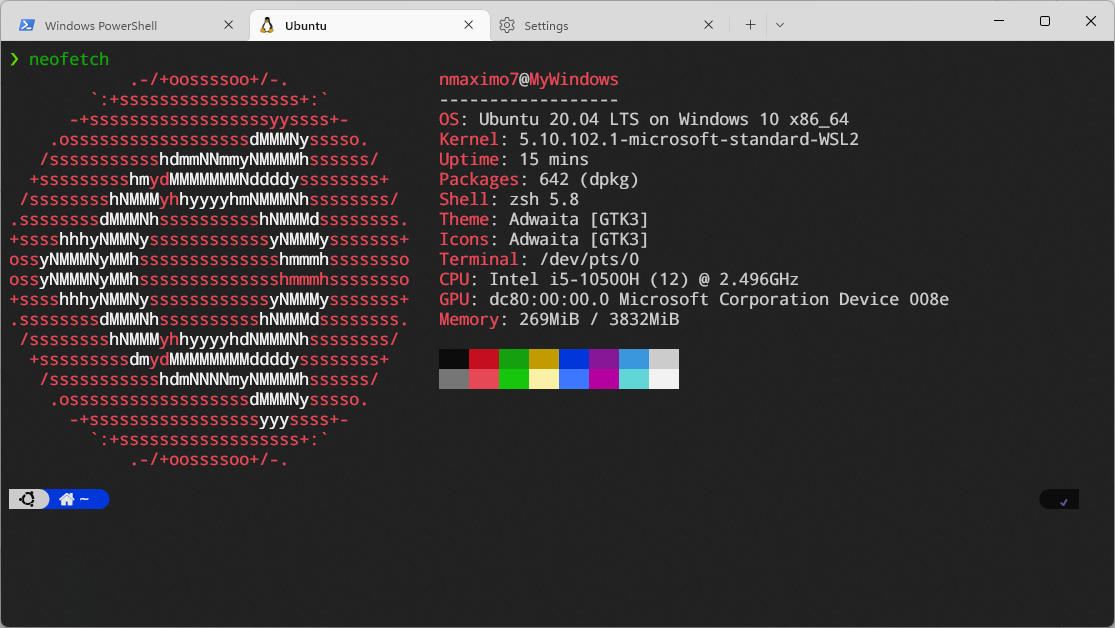
Windows terminal is a modern host application for command-line tools and shells, like Command Prompt, PowerShell, zsh & bash (via WSL), and more. It’s very powerful and offers a lot of customization and productivity features like tabs, themes, customized color schemes, shortcuts, and much more.

To open the Windows Terminal, press the Windows + X keys simultaneously on the keyboard. In the WinX menu, select the Windows Terminal option.

  1. Install Windows Subsystem for Linux (WSL). By using WSL2, you can run a genuine Linux kernel alongside Windows. Press Win + X, then choose Windows PowerShell (Admin): wsl ‐‐install to download and install WSL2 from Microsoft’s repositories. This command will enable the features necessary to run WSL and install the Ubuntu distribution of Linux. You will be prompted to enter a new UNIX password, confirm that password, and then close WSL using the exit command.

    # Verify that it works
    PS C:\Users\Owner> wsl -l -v
    NAME              STATE           VERSION
    * Ubuntu            Running         2
      docker-desktop    Stopped         2
    
  2. To make Windows Terminal able to render fancy icons, install NERD-FONTS. Download a font (FiraCode, Cascadia, or JetBrainsMono recommended) extract and install all .ttf/.otf files (right-click and Install, Windows will copy the fonts into C:\Windows\Fonts). Configure in Windows Terminal Settings:

    "profiles": {
      "defaults": {
          // Use your chosen Nerd Font here
          "fontFace": "FiraCode Nerd Font",
          "fontSize": 12
      }
    }
    
  3. Install Zsh, Neovim, and Oh My Zsh in WSL. Launch your Ubuntu WSL. Open Windows Terminal, click the down arrow (▼), and select Ubuntu.

    # Update your package lists and upgrade
    sudo apt-get update && sudo apt-get upgrade
    # Install essential packages: zsh: Z shell;neovim: Modern Vim-compatible editor;
    # git: Version control; curl: For remote downloads;net-tools: Provides utilities like ifconfig
    sudo apt install zsh neovim git net-tools -y
    # Install Oh My Zsh (community-maintained framework for Zsh):
    sh -c "$(curl -fsSL https://raw.github.com/ohmyzsh/ohmyzsh/master/tools/install.sh)"
    

    When prompted Do you want to change your default shell to zsh? [Y/n], type Y, and press Enter to set zsh as the default shell.

    # Ensure Zsh is now your default shell
    chsh -s $(which zsh)
    # Then, close (`exit`) and reopen WSL (start a new Ubuntu tab in Windows Terminal).
    # Verify that Zsh is your current shell.
    ➜  ~ echo $SHELL
    /usr/bin/zsh
    
  4. Configure Windows Terminal JSON for Productivity, e.g., change Windows Terminal Settings to use Nerd-Fonts (“fontFace”: “DroidSansMono Nerd Font”). Click on Settings in the Windows Terminal menu, Open JSON file.

    Alternatively, you can also access the Open Settings file (JSON) through the Command Palette (Ctrl+Shift+P).

        ...
        {
          // Documentation: https://aka.ms/terminal-documentation
          "$help": "https://aka.ms/terminal-documentation",
          // Schema reference: https://aka.ms/terminal-profiles-schema
          "$schema": "https://aka.ms/terminal-profiles-schema",
    
          // ⌨️ Actions (custom keybindings)
          "actions": [
              {
                  // Copy selected text (multi-line enabled)
                  "command": {
                      "action": "copy",
                      "singleLine": false
                  },
                  "id": "User.copy.644BA8F2"
              },
              {
                  // Paste clipboard content into terminal
                  "command": "paste",
                  "id": "User.paste"
              },
              {
                  // Open search dialog (Ctrl+Shift+F)
                  "command": "find",
                  "id": "User.find"
              },
              {
                  // Split pane with duplicate profile
                  "command": {
                      "action": "splitPane",
                      "split": "auto",
                      "splitMode": "duplicate"
                  },
                  "id": "User.splitPane.A6751878"
              }
          ],
    
          //  When copying text, do not include rich text formatting:
          "copyFormatting": "none",
    
          // Automatically copy selected text to clipboard
          "copyOnSelect": true,
    
          // Default shell profile (Ubuntu)
          "defaultProfile": "{61c54bbd-c2c6-5271-96e7-009a87ff44bf}",
    
          // Global keyboard shortcuts
          "keybindings": [
              {
                  // Ctrl+C - Copy selected text
                  "id": "User.copy.644BA8F2",
                  "keys": "ctrl+c"
              },
              {
                  // Ctrl+V - Paste from clipboard
                  "id": "User.paste",
                  "keys": "ctrl+v"
              },
              {
                  // Ctrl+Shift+F - Open find/search bar
                  "id": "User.find",
                  "keys": "ctrl+shift+f"
              },
              {
                  // ➗ Alt+Shift+D - Split current pane (duplicate)
                  "id": "User.splitPane.A6751878",
                  "keys": "alt+shift+d"
              },
              {
                  // ❌ Win+Shift+Q - Close current tab (or window if last tab)
                  "command": { "action": "closeWindow" },
                  "keys": "win+shift+q"
              }
          ],
    
          // Customize new tab menu (Show any profiles not specifically pinned)
          "newTabMenu": [
              {
                  "type": "remainingProfiles"
              }
          ],
    
          // Shell Profiles configuration
          "profiles": {
              "defaults": {
                  // Visual effects: Acrylic blur with opacity
                  "acrylicOpacity": 75,
                  "useAcrylic": true,
    
                  // Default color scheme
                  "colorScheme": "Dracula",
    
                  // Always use full box cursor
                  "cursorShape": "filledBox",
    
                  // Internal padding: top, right, bottom, left (in pixels)
                  "padding": "10, 5, 10, 10",
    
                  // Default font for all profiles unless overridden
                  "font": {
                      "face": "FiraCode Nerd Font Mono",
                      "fontSize": 12
                  }
              },
    
              "list": [
                  {
                      // Windows PowerShell profile
                      "commandline": "%SystemRoot%\\System32\\WindowsPowerShell\\v1.0\\powershell.exe",
                      "guid": "{61c54bbd-c2c6-5271-96e7-009a87ff44bf}",
                      "hidden": false,
                      // Change the staring directory
                      "startingDirectory": "%USERPROFILE%/Documents/",
                      "name": "Windows PowerShell"
                  },
                  {
                      // Command Prompt (CMD) profile
                      "commandline": "%SystemRoot%\\System32\\cmd.exe",
                      "guid": "{0caa0dad-35be-5f56-a8ff-afceeeaa6101}",
                      "hidden": false,
                      "name": "Command Prompt"
                  },
                  {
                      // Ubuntu WSL profile
                      "guid": "{0665c6cd-cc97-5120-8596-6247c5b3edd3}",
                      "hidden": false,
                      "name": "Ubuntu",
                      "colorScheme": "Tango Dark",
                      "useAcrylic": true,
                      "acrylicOpacity": 0.9,
                      "source": "Microsoft.WSL",
                      "fontFace": "FiraCode Nerd Font"
                  }
              ]
          },
    
          // Color Schemes
          "schemes": [
              {
                  "name": "Dracula",
                  "background": "#1e1f29",
                  "black": "#21222c",
                  "blue": "#bd93f9",
                  "brightBlack": "#6272a4",
                  "brightBlue": "#d6acff",
                  "brightCyan": "#a4ffff",
                  "brightGreen": "#69ff94",
                  "brightPurple": "#ff92df",
                  "brightRed": "#ff6e6e",
                  "brightWhite": "#ffffff",
                  "brightYellow": "#ffffa5",
                  "cyan": "#8be9fd",
                  "foreground": "#f8f8f2",
                  "green": "#50fa7b",
                  "purple": "#ff79c6",
                  "red": "#ff5555",
                  "white": "#f8f8f2",
                  "yellow": "#f1fa8c"
              }
          ],
    
          // Themes (optional): You can define light/dark mode switching here
          "themes": []
      }
        }
    
  5. Essential Zsh Plugins. Once you have Oh My Zsh installed, it’s time to add a few plugins that dramatically improve your command-line experience.

      # Install plugins
      # zsh-autosuggestions is a fish-like fast and unobtrusive autosuggestions for zsh, a real time saver!
      git clone https://github.com/zsh-users/zsh-autosuggestions ${ZSH_CUSTOM:-~/.oh-my-zsh/custom}/plugins/zsh-autosuggestions
      # zsh-syntax-highlighting provides syntax highlighting for the shell zsh.
      git clone https://github.com/zsh-users/zsh-syntax-highlighting ${ZSH_CUSTOM:-~/.oh-my-zsh/custom}/plugins/zsh-syntax-highlighting
      # Zsh-z is a command-line tool that allows you to jump quickly to directories that you have visited frequently or recently
      git clone https://github.com/agkozak/zsh-z ${ZSH_CUSTOM:-~/.oh-my-zsh/custom}/plugins/zsh-z
    
      # Enable these plugins in your ~/.zshrc
      plugins=(git zsh-autosuggestions zsh-syntax-highlighting z)
      # Save and quit. Then reload Zsh:
      source ~/.zshrc
    

    Ensure Docker Desktop is running on Windows. Launch Docker Desktop. Go to Settings, General and make sure Use WSL 2 based engine is checked. Go to Settings, Resources, WSL Integration. Enable integration for your desired Linux distributions (e.g., Ubuntu). Check the box next to each WSL distro you want Docker to support. Click Apply & Restart if you make changes.

  6. To resize the text, hold down the Ctrl key, then press + (plus) or – (minus) to increase or decrease font size. Alternatively, click the drop-down menu next to the New tab (+) button, select Settings, Defaults from the left pane, Appearance, Font Size. Then, change the font size as needed.

  7. The Windows Terminal supports opening multiple tabs and splitting the terminal into multiple panes for better productivity and multitasking. To split the terminal into two panes, press Alt, Shift, and d (automatically split the current pane optimally), Alt, Shift, and + (split vertically), Alt, Shift, and - (split horizontally). To move focus between panes, press Alt + arrow keys. Ctrl, S­hift, and w close innermost pane, tab, or window.

  8. To open a hyperlink with your mouse, use Ctrl + click. Alt + Enter/F11 toggle full-screen mode on/off. Alt + F4 close the current window (all tabs). 
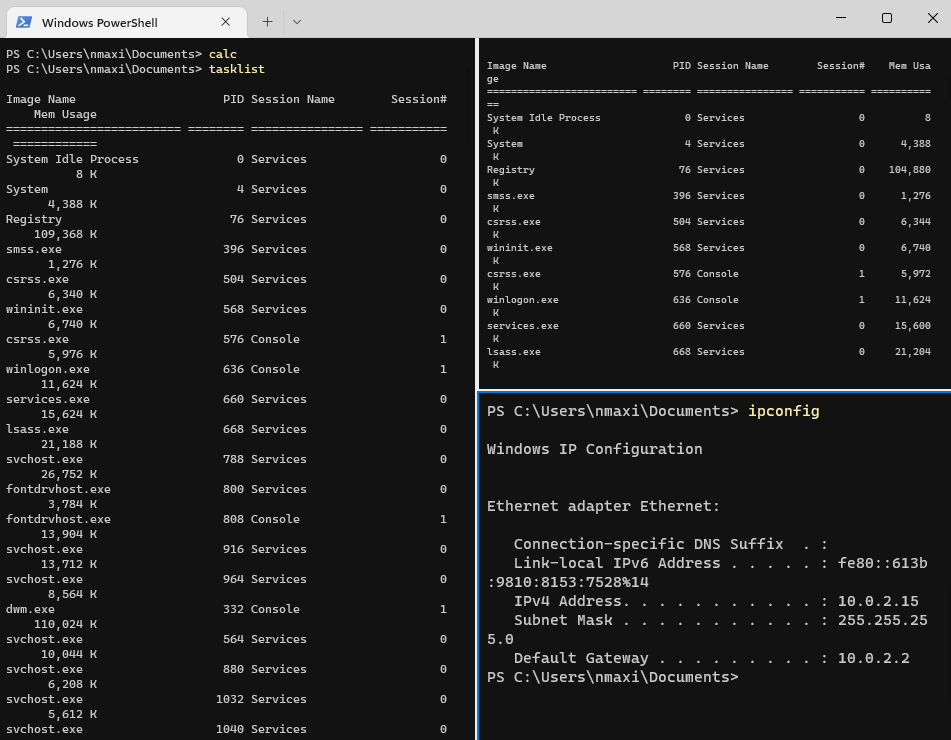
The Windows Terminal supports splitting the panes for better productivity and multitasking. 

  9. Install Docker Desktop & Ollama. Download Docker Desktop for Windows. Run the installer, ensure WSL 2 backend is selected. At the end, check Enable WSL integration for your Ubuntu distribution. Test Docker in WSL: Launch the Ubuntu profile in Windows Terminal and run docker run hello-world. You should see a “Hello from Docker!” message, confirming Docker can pull and run containers from within WSL.

    # Install Ollama in WSL. In your Ubuntu WSL terminal, run:
    curl -fsSL https://ollama.com/install.sh | sh
    # Verify the installation of Ollama.
    ➜  ~ ollama -v
    ollama version is 0.9.0
    # Add/pull a model
    ollama pull deepseek-v3:671b
    # Run a model interactively
    ollama run deepseek-v3:671b
    # Remove a model
    ollama rm deepseek-v3:671b
    ➜  ~ ollama run deepseek-r1:70b
    success
    >>> what are the most important commands in Ollama (large language models)
    Thinking...
    Okay, so I'm trying to figure out what the most important commands are when using Ollama, which is a large language model. [...]
    
    1. **Set the Tone/Style**: Guides the response tone, such as formal or friendly.
    2. **Specify Format**: Requests responses in bullet points, steps, etc., for clarity.
    3. **Provide Context**: Tailors answers by including background information.
    4. **Ask for Examples**: Clarifies concepts with concrete instances.
    5. **Clarify/Elaborate**: Seeks more detailed explanations when needed.
    6. **Summarize Information**: Condenses responses into key points [...]
    
    >>> /?
    Available Commands:
    /set            Set session variables
    /show           Show model information
    /load    Load a session or model
    /save    Save your current session
    /clear          Clear session context
    /bye            Exit
    /?, /help       Help for a command
    /? shortcuts    Help for keyboard shortcuts
    
    Use """ to begin a multi-line message.
    
    >>> /bye
    ifconfig
    [...]
    inet 172.22.110.143  netmask 255.255.240.0  broadcast 172.22.111.255
    
    # Edit the Ollama service file
    sudo vim /etc/systemd/system/ollama.service
    [...]
    # By default, Ollama binds to 127.0.0.1:11434 (loopback) inside WSL, which means you can only access it from within WSL itself.
    # If you want to reach Ollama from Windows or any other device on your LAN, you must reconfigure Ollama to listen on 0.0.0.0:11434
    # To make Ollama listen on all available network interfaces within WSL
    Environment="OLLAMA_HOST=0.0.0.0:11434"
    
    # Reload systemd and restart Ollama
    sudo systemctl daemon-reload
    sudo systemctl enable ollama.service
    sudo systemctl restart ollama
    
    # In Windows Subsystem for Linux (WSL), networkingMode=mirrored indicates a networking configuration where the WSL distribution directly accesses the network interfaces of the Windows host machine.
    # To enable this mode, users must create or modify the .wslconfig file. This file is not present by default and must be placed in the user's %UserProfile% directory on the Windows side (e.g., C:\Users\Owner\.wslconfig).
    [wsl2]
    networkingMode=mirrored
    
    # WSL must be completely shut down
    wsl --shutdown
    # You can restart by launching your Linux distribution.
    
    # Allows inbound traffic through the Windows firewall for the WSL VM interface.
    Set-NetFirewallHyperVVMSetting -Name '{40E0AC32-46A5-438A-A0B2-2B479E8F2E90}' -DefaultInboundAction Allow
    # In Windows, open PowerShell or Command Prompt and run:
    PS C:\Users\Owner\Documents> Invoke-WebRequest -Uri http://localhost:11434/api/generate -Method Post -Body '{"model":"llama3.2","prompt":"Hello"}' -ContentType 'application/json'
    
    
    StatusCode        : 200
    StatusDescription : OK
    Content           : {123, 34, 109, 111...}
    RawContent        : HTTP/1.1 200 OK
                        Transfer-Encoding: chunked
    
    
                        {"model":"llama3.2","created_at":"2025-06-03T11:39:01.620488434Z","response":"Ho...
    

    To completely remove Ollama from your Ubuntu setup running under WSL (Windows Subsystem for Linux), follow these instructions:

    Ollama can’t run simultaneously on both native Ubuntu and WSL because it binds to a specific port (localhost:11434), and only one instance can occupy that at a time.+-
    -0;897JH6G54\3er2w1`+

    # Stop and disable the Ollama service
    sudo systemctl stop ollama
    sudo systemctl disable ollama
    sudo rm /etc/systemd/system/ollama.service
    
    # Remove the Ollama binary
    sudo rm $(which ollama)
    
    # Delete model files and configuration folders
    sudo rm -r /usr/share/ollama
    sudo rm -r ~/.ollama
    
    # Delete group Ollama
    sudo grou/pdel ollama
    

Spice your macOS Terminal with iTerm

iTerm2 is a replacement for your macOS Terminal. It brings the terminal into the modern age. It's highly customizable and comes with a lot of useful features.

  1. iTerm2 Installation: brew install ‐‐cask iterm2
  2. Zsh is a new and extended shell designed for interactive use with plenty of new features and plugin and theme support: brew install zsh zsh-completions.
  3. Set a hotkey to open/close the terminal. Go to iTerm2, Preferences, Keys, select the HotKey tab and then click Create a Dedicated Hotkey Window: Hotkey (Ctrl+Alt+t), then check Animate showing and hiding and Show this Hotkey Windows. Next, go to iTerm2, Preferences, Profiles, click on the Hotkey Window Profile, and then select the Window tab, Style (Full Screen). Finally, System Preferences, Users & Groups, go to the Login items tab, +, then navigate to your Applications folder and select iTerm.
  4. Install Oh My Zsh:
    sh -c "$(curl -fsSL https://raw.github.com/robbyrussell/oh-my-zsh/master/tools/install.sh)"
    
  5. Install PowerLevel10k, zsh-syntax-highlighting, zsh-autosuggestions:
    git clone https://github.com/romkatv/powerlevel10k.git $ZSH_CUSTOM/themes/powerlevel10k
    p10k configure # If you are using iTerm2, p10 configure can install the Meslo Nerd Font for you.
    git clone https://github.com/zsh-users/zsh-syntax-highlighting.git ${ZSH_CUSTOM:-~/.oh-my-zsh/custom}/plugins/zsh-syntax-highlighting
    git clone https://github.com/zsh-users/zsh-autosuggestions $ZSH_CUSTOM/plugins/zsh-autosuggestions
    
    nvim .zshrc
    ZSH_THEME="powerlevel10k/powerlevel10k"
    [...]
    plugins=(git zsh-syntax-highlighting zsh-autosuggestions colored-man-pages colorize pip python brew)
    [...]
    # To customize prompt, run `p10k configure` or edit ~/.p10k.zsh.
    [[ ! -f ~/.p10k.zsh ]] || source ~/.p10k.zsh
    
    Besides, Starship is a customizable prompt that you may want to try out.
  6. Configure the terminal to use Meslo Nerd Font, change the font size and add a better text cursor: iTerm, Preferences, Profiles (Profile Name: Hotkey Window) go to the Text tab: Cursor (Vertical bar; Blinking cursor); Font (MesloLGS NF, Regular, 14/18).
  7. To toggle full-screen mode, press Command ⌘ + Enter. To click a link, Command ⌘ + Click.
  8. When you first start iTerm2, a window opens showing a terminal session. If you want to open more than one session at a time…

each of which is a separate session.
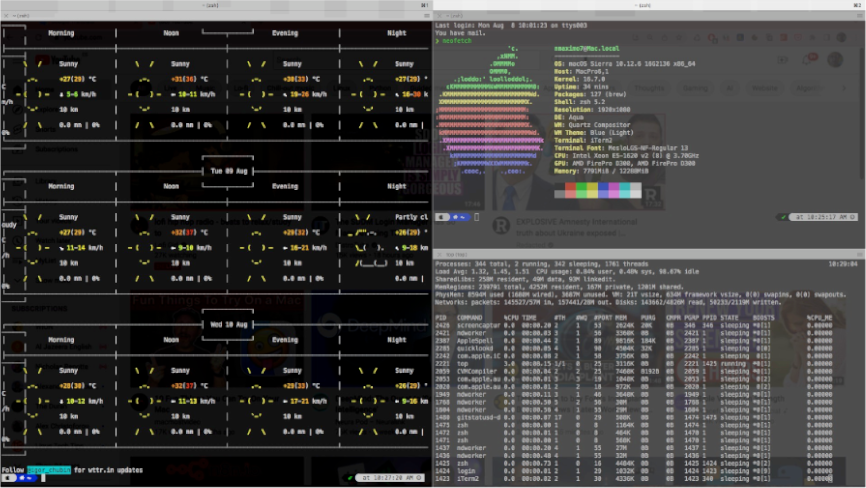
iTerm2  An iTerm2 Cheatsheet

Bitcoin donation

JustToThePoint Copyright © 2011 - 2025 Anawim. ALL RIGHTS RESERVED. Bilingual e-books, articles, and videos to help your child and your entire family succeed, develop a healthy lifestyle, and have a lot of fun. Social Issues, Join us.

This website uses cookies to improve your navigation experience.
By continuing, you are consenting to our use of cookies, in accordance with our Cookies Policy and Website Terms and Conditions of use.