|
 |
 |
|
 |
|
|
|
|
|
|
Programming today is a race between software engineers striving to build bigger and better idiot-proof programs, and the Universe trying to produce bigger and better idiots. So far, the Universe is winning, Rick Cook
Python is a simple, easy-to-understand, and minimalistic language, and yet very powerful.It is one of the easiest programming languages to learn because it has a clean and readable syntax that makes it easy for beginners to read and use. Besides, Python is free and open-source.
Python is an interpreted, high-level, and general-purpose programming language with batteries included. It is used for web development, AI, machine learning, operating systems, mobile application development, and video games.
Ubuntu, Debian: sudo apt-get install python3 python3-pip python3-venv. Arch: sudo pacman -S python python-pip
Install Visual Studio Code and some extensions. Arch:
    git clone https://aur.archlinux.org/visual-studio-code-bin.git
    cd visual-studio-code-bin
    makepkg -si
    cd ..
    rm -rf visual-studio-code-bin
    yay -S consolas-font

    code --install-extension ms-python.python
    code --install-extension oderwat.indent-rainbow
    code --install-extension visualstudioexptteam.vscodeintellicode
    code --install-extension pkief.material-icon-theme
    code --install-extension eg2.vscode-npm-script
    code --install-extension streetsidesoftware.code-spell-checker
    code --install-extension streetsidesoftware.code-spell-checker-spanish
There is no visual-studio-bin package, but you can use yay (AUR helper). To install/update it using yay: yay -S visual-studio-code-bin
Open Folder, e.g, /home/myUser/myPython.
New File. You may have a warning: Linter pylint (a source-code, bug and quality checker for Python) is not installed. Click on Install.
Create a virtual environment (python3 -m venv venv) and activate it (source ./venv/bin/activate). If you want to deactive it, you need to type deactivate.
Visual Studio Code is a multiplatform source-code editor made by Microsoft. Visual Studio Code functionality can be extended using extensions.
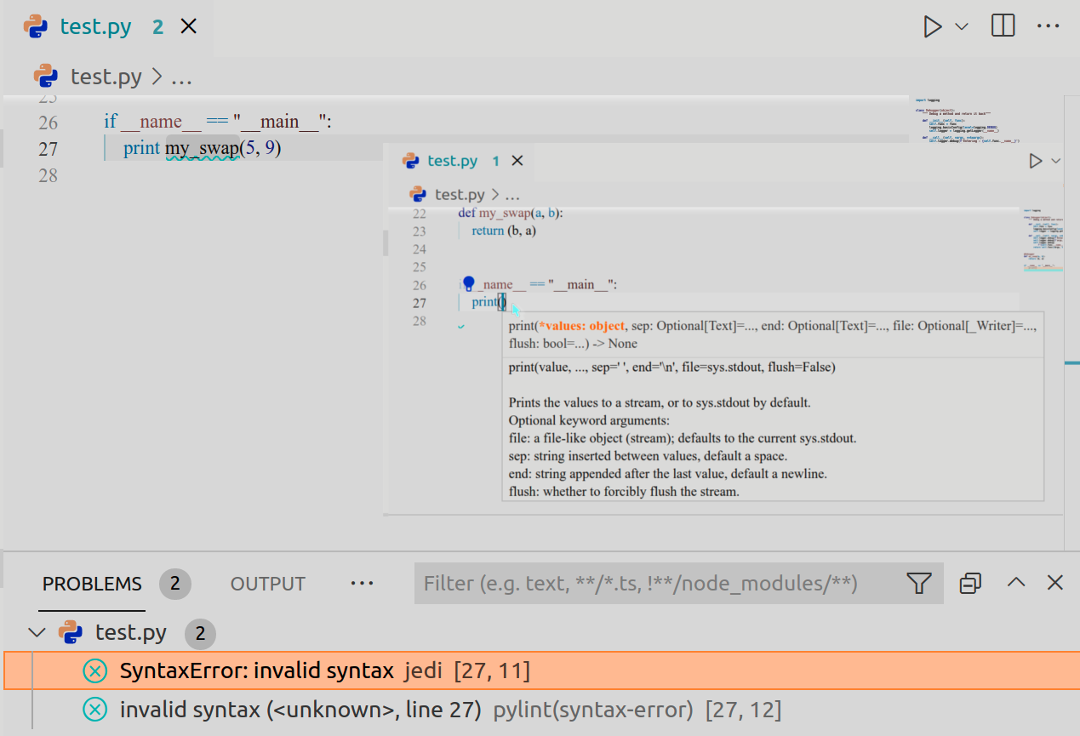
Let’s install Python extension for Visual Studio Code, Sublime Text Keymap (it imports keybindings and settings from Sublime Text to Visual Studio Code), Python-autopep8 (it automatically formats Python code. Linux’s shortcut is Ctrl+Shift+I), Pylint (a Python code analysis tool which looks for programming errors, e.g., print myswap(5, 9) as you can see in the screenshot below), Code Runner, and One Dark Pro by opening the Command Palette (Ctrl+Shift+P) and typing Extensions: Install Extensions.
Visual Studio Code provides an easy keyboard shortcuts editing experience using its Keyboard Shortcuts editor. You can open it by going to the menu File/Code, Preferences, Keyboard Shortcuts or using the Command Palette (Ctrl+Shift+P), Preferences: Open Keyboard Shortcuts.
Create an empty folder (mkdir python), navigate into it (cd python) and open VS Code (code). Alternatively, you can launch VS Code, then go to the File menu and select Open Folder… to open the project folder.
Immediately after that, select a Python 3 interpreter by opening the Command Palette (Ctrl+Shift+P) and typing the Python: Select Interpreter command to search, then select the Python’s version that you want to work with.
Create a Python source code file: File, New File. As you start writing your Python code, Visual Studio Code may give you a warning: Linter pylint (a source code, bug, and quality checker for Python) is not installed. Click on Install.
Run your source code file. Click on the Run Python File in Terminal button in the top-right side of the editor.
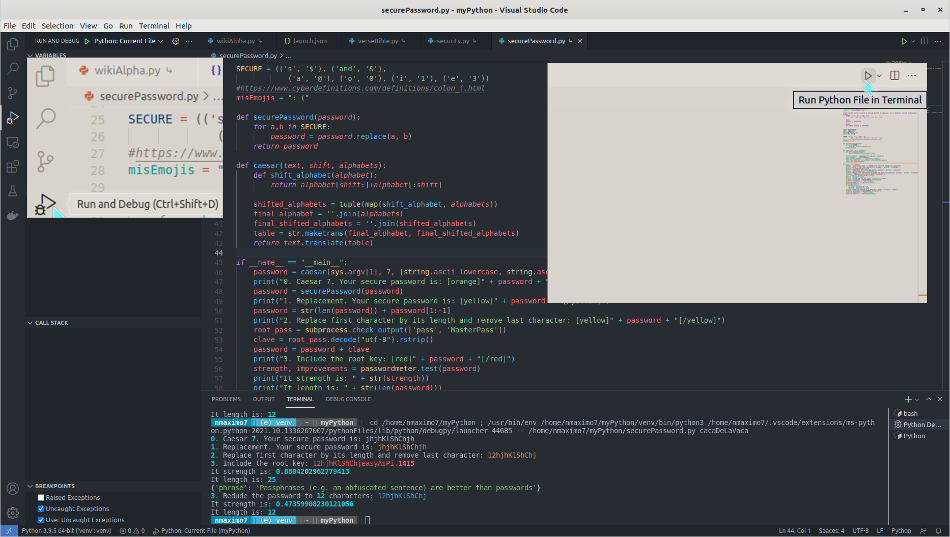
To run or debug an app, select Run and Debug on the Debug start view, Run, Start Debugging on the main menu, or just press F5, and VS Code will run your currently active file.
VS Code keeps debugging configuration information in a launch.json file. Navigate through Run, Open Configuration and you will be able to edit it. You may want to pass some arguments into the program by defining them in the args setting of this file as shown below:
{
    // Use IntelliSense to learn about possible attributes.
    // Hover to view descriptions of existing attributes.
    // For more information, visit: https://go.microsoft.com/fwlink/?linkid=830387
    "version": "0.2.0",
    "configurations": [
        {
            "name": "Python: Current File",
            "type": "python",
            "request": "launch",
            "program": "${file}",
            "args":["myarg1", "myarg2"],
            "console": "integratedTerminal"
        }
    ]
}
Activate a virtual environment: source myProject/bin/activate. To deactivate it: deactivate
If you want to install packages in your environment: python3 -m pip install yourPackage
You may found the following error: VSCode: There is no Pip installer available in the selected environment. Solution: Edit the file ./venv/pyvenv.cfg:
include-system-site-packages = true
Python files will now go to the virtual environment, but the system packages will be visible, too.
{
    "workbench.colorTheme": "One Dark Pro", // Color theme: "One Dark Pro", "Predawn", "Default Dark+", etc.
    "files.autoSave": "afterDelay", // It saves your files after a configured delay (default 1s).
    "explorer.confirmDelete": false,
    "window.zoomLevel": 4, // It adjusts the zoom level of the window.
    "editor.insertSpaces": false,
    "editor.fontFamily": "Consolas", // It controls the font family, yay -S consolas-font
    "editor.fontSize": 13, // It controls the font size.
    "workbench.settings.openDefaultSettings": true, // It controls whether opening settings also opens an editor showing all default settings.
    "workbench.settings.editor":"json", // By default VS Code shows the Settings editor, we want to edit the underlying settings.json
    "workbench.settings.useSplitJSON": true, // It controls whether to use the split JSON editor when editing settings as JSON or not.
    "python.formatting.provider": "autopep8", // This is the provider for formatting your code.
    "editor.formatOnSave": true, // The code is automatically formatted every time you save a file.
    "code-runner.executorMap": {
        "python": "$pythonPath -u $fullFileName",
     }, // It tells Code Runner to use the pythonPath variable.
    "code-runner.showExecutionMessage": false, // Don't show any extra execution message like [Running] and [Done]
    "code-runner.clearPreviousOutput": true, // Clear previous output before each run.
    "terminal.integrated.defaultProfile.osx": "zsh", // Use Zsh Shell
    "terminal.external.osxExec": "iTerm.app", // Use the iTerm terminal (macOS)
    "terminal.integrated.fontFamily": "MesloLGS NF", // To use Powerline fonts in the integrated terminal, you need to specify the font family.
    "workbench.iconTheme": "material-icon-theme", // Icon theme: "material-icon-theme", "ayu", "vs-seti", etc.
    "cSpell.userWords": [
        "bilingüe"
    ],
    "cSpell.language": "en, es" //Code Spell Checker
}
    credentials.py
    venv
    __pycache__
    *.pkl
    Backup
    *.__pycache__
    *.pickle
    *.txt
git remote set-url origin https://TOKEN@github.com/UserName/RepositoryName.git
Some resources: The Ultimate Python Resource Hub, w3Schools, The Algorithms, etc.
If you have this error: TabError: inconsistent use of tabs and spaces in indentation using VS Code. You may want to convert existing indentation from spaces to tabs by hitting Ctrl + Shift + P and type: Convert indentation to Tabs.
Command Palette (Ctrl+Shift+P), Preferences: Configure User Snippets, then click on New Global Snippets file… or select a specific language (markdown)
{
    "Insert Raw HTML": {
        "prefix": "raw",
        "body": [
            "{{< raw >}}",
            "${1: markdown_content}",
            "{{< /raw >}}"
            ],
        "description": "Insert Raw HTML"
    },
    "Insert Code": {
        "prefix": "code",
        "body": [
            "``` ${1|html,python,md,bash,javascript,json|} ",
            "${2: markdown_content}",
            "```"
        ],
        "description": "Insert Code"
    },
    "Markdown link": {
        "prefix": "link",
        "body": [
            "[${1: link_text}](${2: link_url})"
        ],
        "description": "Markdown link"
    }
}
prefix defines the trigger word that display the snippet. body is one or more lines of content, and description is an optional description of the snippet.
Some snippets have placeholders, e.g., ${1: markdown_content}, so you can quickly jump to the next placeholder with Tab. Placeholders can have choices as values, e.g., ${1|html,python,md,bash,javascript,json|}. When the snippet is inserted and the current placeholder is selected, these choices will be prompted to the user to pick one of them.
You can use Snippet generator to create snippets for Visual Studio Code, Sublime Text, and Atom.
If your snippets don’t work, go to Preferences: Open Settings (JSON), and add the line: “editor.quickSuggestions”: true.
code dotfiles (dotfiles is where I save all my configuration files)
Let’s add settings.json. First, we need to create the structure: Code, .config, Code - OSS, User, settings.json. Besides, we will create the snippets folder inside the User. Our markdown.json file with all our Markdown’s snippets is inside this folder. 2.1 Get the list of all installed extensions: code ‐‐list-extensions > vs-code-extensions.txt
stow ‐‐adopt -nvt ~ *
stow -nv ~ *
cd ~/dotfiles
git add . && git commit -am “my Code configuration” && git push
{
    "version": "2.0.0",
    "tasks": [
        {
            "label": "Start Hugo Server",
            "type": "shell",
            "command": "hugo server",
            "group": "none",
            "presentation": {
                "reveal": "silent"
            },
            "problemMatcher": [],
            "runOptions": {
                "runOn": "folderOpen"
            }
        }
    ]
}

JustToThePoint Copyright © 2011 - 2024 Anawim. ALL RIGHTS RESERVED. Bilingual e-books, articles, and videos to help your child and your entire family succeed, develop a healthy lifestyle, and have a lot of fun. Social Issues, Join us.
This website uses cookies to improve your navigation experience.
By continuing, you are consenting to our use of cookies, in accordance with our Cookies Policy and Website Terms and Conditions of use.