JustToThePoint English Website Version
JustToThePoint en español

Maximize your online presence with our exclusive offer: Get a stunning hero banner, the hero you need and deserve, at an unbeatable price! Bew, 689282782, bupparchard@gmail.com

How to Batch Convert, Compress, and Resize Images

Image compression is the process of reducing the weight on an image by decreasing its size and encoding less information or encoding it more efficiently,ideally without affecting or lowering the picture’s quality, in order to improve file-sharing, downloading, and viewing speeds.

Mass Image Compressor

Mass Image Compressor is a free point and shoot batch image compressor and converter tool for Web site optimization, photographers, HTML game creators and casual Windows users. Mass Image Compressor 
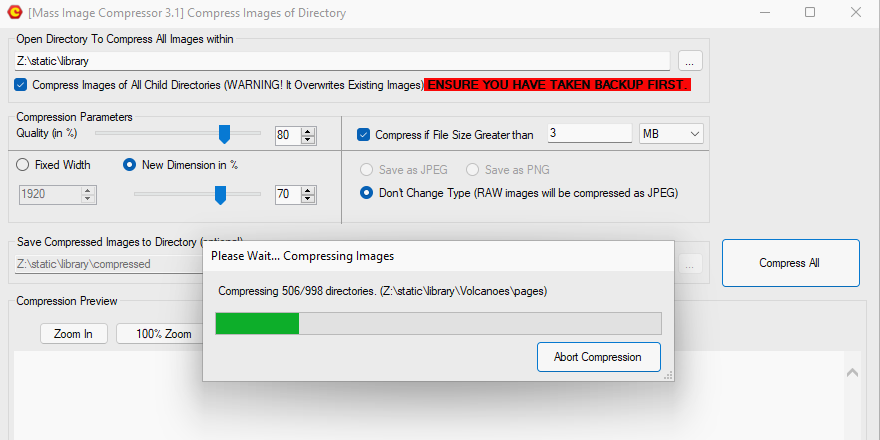
  1. Download Mass Image Compressor, install, and launch it.
  2. Open Directory to Compress All Images within: it lets you select the source folder with the images you want to compress. Check Compress Images of All Child Directories to compress all the images present in sub-folders.
    💀 Please, observe that it will overwrite the original images present in those sub-folders.
  3. Adjust the compression parameters: Quality (e.g., 80%) and Dimensions (e.g. New Dimension in %, 70%).
  4. Select the final format (JPEG or PNG) to save your images or check Don’t Change Type. If you are converting RAW images, then the output format is set to JPEG.
  5. If you want to only compress images having a bigger size than a configured size (e.g., 3 MB), check Compress if File Size Greater than.
  6. Finally, smash the Compress All button.

Conveseen

Converseen is a free and open source, cross-platform GUI software for batch image conversion and resizing. You can use it to convert, compress, resize, rotate, and flip multiple images at once with a single click. Converseen
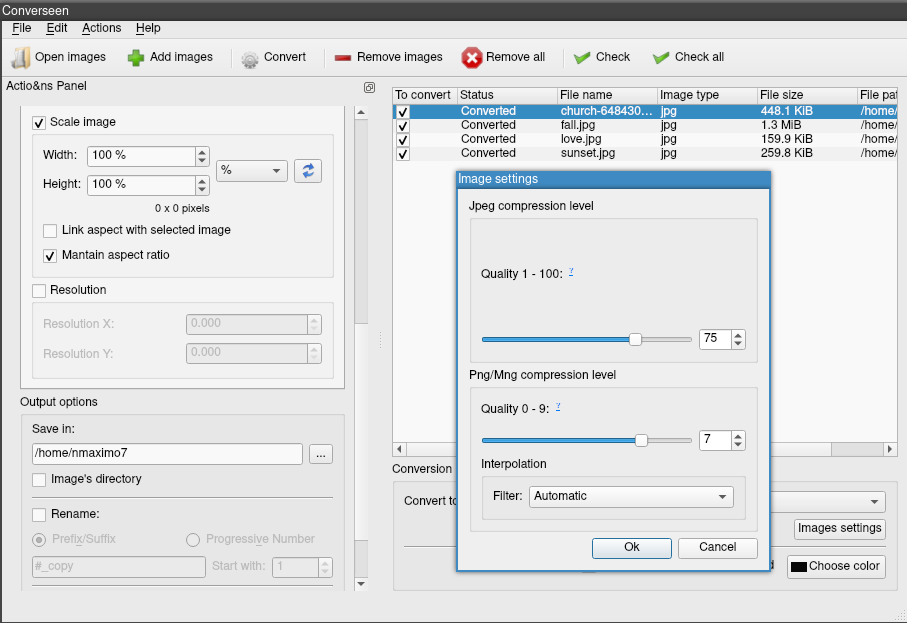
  1. Installation: Windows (You may need to install Visual C++ Redistributable for Visual Studio 2015 and Ghostscript (32 bit). This could be done quickly from the same website) and Linux (sudo apt install converseen -Ubuntu-; sudo pacman -Sy converseen -Arch-).
  2. Open the Applications menu, search for Converseen, and launch it or just type in your terminal converseen.
  3. Click on the Add images button. Navigate to the folder containing the images you want to process, select/highlight them, and smash the Open button to import them into Converseen.
  4. Click on the Check all button in the toolbar to select all the images you have just opened/imported.
  5. You can convert the images to a number of formats like JPEG, JPG, TIFF, etc. Tap the dropdown button Convert to and pick a format from the list: Don’t change the format, JPEG, WEBP, etc.
  6. Set the quality of the compression by clicking on the Image setting button.
  7. If your images have a transparent background, you can check the Replace Transparent Background option and select a new color (Choose color) for the background.
  8. Click on the Dimension tab in the left window, tap on the Scale image checkbox just below it, enter your desired width (e.g. 1200 px or 85%), and check the Maintain aspect ratio (resize images but keeping the same aspect ratio).
  9. You can overwrite the existing images or Rename them (Prefix/Suffix e.g., #_copy or Progressive Number) in the same directory or some other location.
  10. Finally, click on the Convert button to begin the batch processing.

ImageMagick

ImageMagick is a free and open-source cross-platform software suite for displaying, creating, converting, modifying, and editing raster images. It is designed for batch processing of images. Let’s see some examples. Image 

  1. Installation. Windows (ImageMagick, Download, Windows Binary Release), macOS (brew install imagemagick, brew install ghostscript), and Linux (sudo apt install imagemagick).

  2. Display a single file/all the files in a directory: display myImage.jpg / display *.png.

  3. Flip image in the vertical/horizontal direction: display -flip myImage.jpg / display -flop myImage.jpg.

  4. Convert [a single file/all the files in a directory] between image formats: convert bridge.jpg -monochrome bridgeMonochrome.jpg (it transforms bridge.jpg from color to black and white) / convert *.jpg *.png (it converts multiples files from jpg to png) / convert *.png *.jpg (and vice-versa).

    convert’s syntax format is as follows: convert inputFileName [options] outputFileName

  5. Improve brightness/contrast of the image: convert -brightness-contrast 20x8 myImage.jpg output.jpg. It increases the brightness by 20 and the contrast by 8.

  6. Resize to specific dimensions and keep the aspect ratio: convert myImage.jpg -resize 800 output.jpg (it resizes myImage.jpg to 800 pixels wide), convert myImage.jpg -resize “50%” Backup/resizeMyImage.jpg (it resizes myImage.jpg by 30% and save it in another folder), mogrify -path Backup/ -resize 800 *.jpg (it takes all the JPEG files in the current directory, resize them to 800 pixels wide, and save then in the Backup directory).

  7. Blur images: convert -blur 2x3 myImage.jpg output.jpg

  8. Add text: convert -font Helvetica -fill white -gravity SouthEast -annotate +0+10 ‘The bridge’ bridge.jpg output.jpg (gravity SouthEast moves the text to the bottom right of the image, font renders text with a particular font, fill defines the color).

  9. Swirl images pixels about the center: convert -swirl 180 myImage.jpg output.jpg

  10. We can use scripts for batch-processing of the images.

            for j in *.jpg
            do 
                convert -monochrome "$j" altered_"$j"
            done
    
  11. Add a border: convert -border 1x1 -bordercolor “#000000” sourceImage.jpg newImage.jpg

Other options are FastStone Image Viewer (Tools, Batch Convert Selected Images) and Irfan View (File, Batch Conversion/Rename).

jpegoptim

jpegoptim is an open source, command-line utility to optimize and compress jpegs/jpgs with or without quality loss

 du -h | sort -h # Display the disk usage of files and directories in human-readable format and sort them by size
 find . -type f -name "*.jpg" | xargs jpegoptim --max=85 -f --strip-all
 find . -type f -name "*.jpg" | xargs -I {} mogrify -resize 2480x3508 {} && jpegoptim --max=85 -f --strip-all {} # To change the dimensions of the images, we use a tool mogrify from the ImageMagick suite.

It leverages find to locate all JPEG files recursively (finds all files with a jpg extension in the current directory and its subdirectories) and xargs (it pipes the list of found files to xargs with passes them as arguments to jpegoptim) to pass those files to jpegoptim for compression.

The arguments are: ‐‐max = 85 (it sets the maximum quality factor or the compression level to 85), ‐f (forces optimization even if the file seems already optimized), ‐‐strip-all (it strips all metadata from the files).

Credits: List of Freeware, 12 Best Free Batch Image Optimizer Software For Windows

Bitcoin donation

JustToThePoint Copyright © 2011 - 2024 Anawim. ALL RIGHTS RESERVED. Bilingual e-books, articles, and videos to help your child and your entire family succeed, develop a healthy lifestyle, and have a lot of fun. Social Issues, Join us.

This website uses cookies to improve your navigation experience.
By continuing, you are consenting to our use of cookies, in accordance with our Cookies Policy and Website Terms and Conditions of use.