



JustToThePoint English Website Version
JustToThePoint en español

How to use and share a single mouse/keyboard across devices

Barrier is a free and open-source KVM forked from Synergy. It mimics the functionality of a KVM switch. It allows you to use and share a single mouse and keyboard across multiple devices. For instance, my macOS (server) and Ubuntu (client).

For Windows and MacOS (brew install barrier), the latest packages are available here. Ubuntu: sudo snap install barrier. Arch: pacman -S barrier.

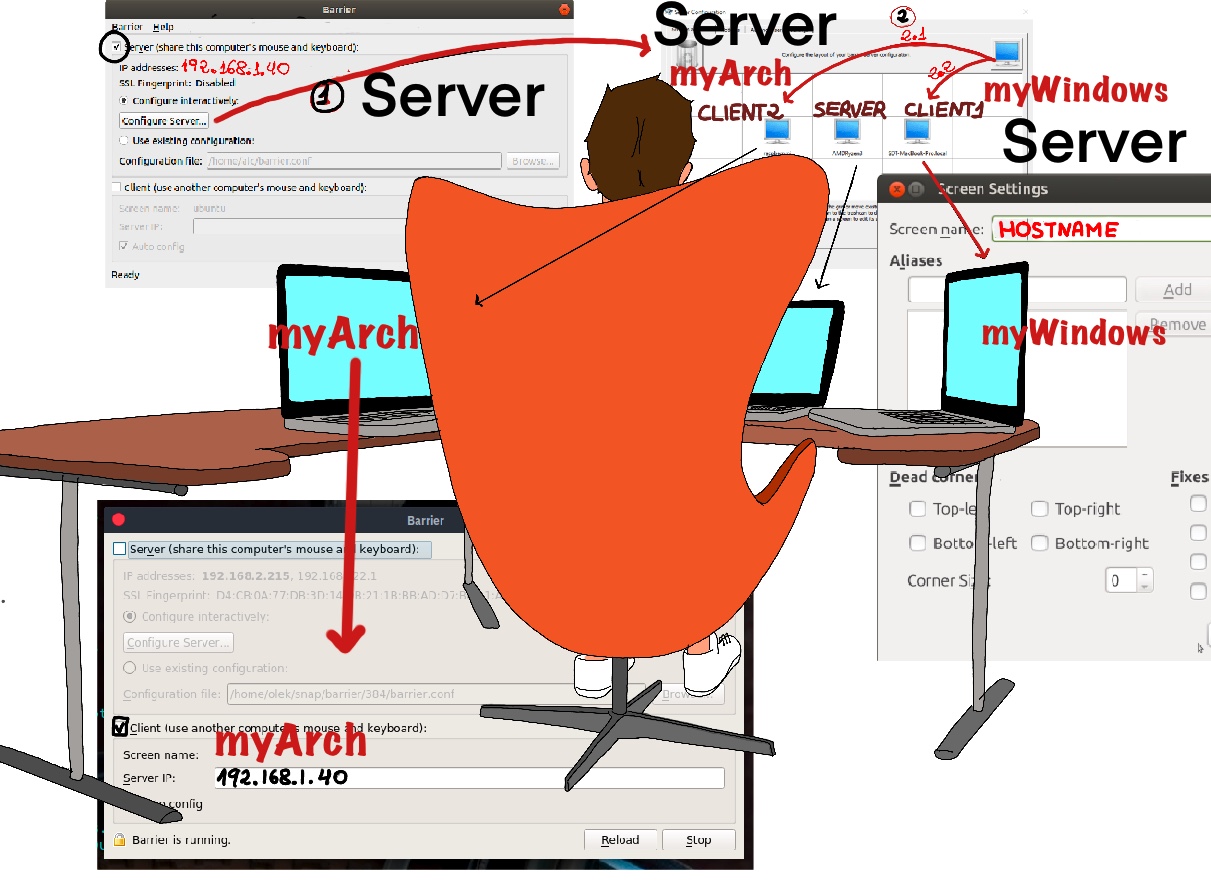
Step 1. MacOS: Server (share this computer’s mouse and keyboard). Click on Configure Server…

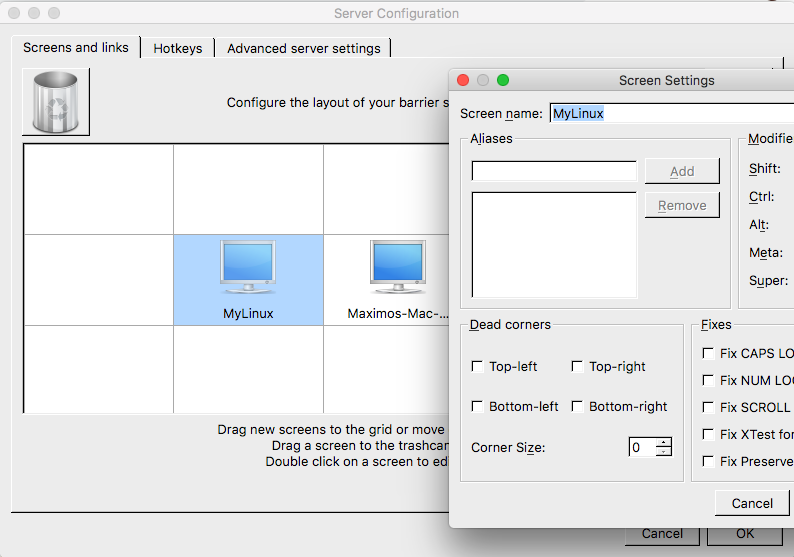
Drag and drop the computer icon from the top right to a suitable position. The position is essential because that’s how your mouse pointer will move between screens. Observe that you should provide the hostname of the client computer.
Barrier

My Barrier server configuration. Left to right: MyLinux (PC, Ubuntu), Maximos-Mac-… (my MacPro, macOS).

Step 2. Ubuntu: Client (use another computer’s mouse and keyboard). Disable Auto config. Screen name: MyLinux. Server IP: 192.168.1.40 (my MacOS’s IP).

Maybe you could set up Barrier to run on startup. Launch Startup Applications: Name (Barrier), Command (/usr/bin/barrier).

Step 3. Set Barrier to automatically launch at boot up (macOS). Go to System Preferences and click Users & Groups. Then, click on Login Items. At the bottom left corner of the window, click on the lock icon and enter your admin password. Click the plus (+) sign, Applications and select Barrier to auto-start.
Barrier

Sharing a mouse and keyboard between Windows and nixOS.

Input-Leap is a direct fork of Barrier by Barrier's own active maintainers. It enables seamless mouse/keyboard sharing across machines. Add to your home.nix or home-manager.nix:

# ── Input-Leap (replaces services.barrier, removed in 25.11) ─────────────────
# input-leap is a direct fork of barrier by barrier's own maintainers.
# home-manager 25.11 has no services.input-leap module yet, so we wire
# it up as a plain systemd user service.
{ config, pkgs, ... }:
{
  # 1. Install the package
  home.packages = [ pkgs.input-leap ];

  # 2. Systemd user service for Input Leap client
  systemd.user.services.input-leap-client = {
    Unit = {
      Description    = "Input Leap client (screen sharing — controlled screen)";
      After          = [ "graphical-session.target" ];
      PartOf         = [ "graphical-session.target" ];
    };

    Service = {
    # Replace with your server's hostname or IP (192.168.1.12) and port (default Input Leap port is 24800), and your screen name
      # --no-daemon: Run in foreground (required for systemd)
      # --disable-crypto: No TLS encryption (use only on trusted LAN, unsafe but easy)
      # --name: Screen name must match server's configuration, e.g., nixos
			ExecStart = "${pkgs.input-leap}/bin/input-leapc --no-daemon --disable-crypto --name nixos 192.168.1.12:24800";
			Restart    = "on-failure";
			RestartSec = "5s";

      # Ensure graceful shutdown
      KillMode = "process";
		};

		Install = {
				WantedBy = [ "graphical-session.target" ];
		};
  };
}
Windows PowerShell (as an administrator)
New-NetFirewallRule -DisplayName "Barrier" -Direction Inbound -LocalPort 24800 -Protocol TCP -Action Allow

Create a new firewall rule that allows inbound traffic on a specific port.

  1. New-NetFirewallRule: It creates a new rule in the Windows Firewall.
  2. DisplayName “Barrier”: Sets the name of the firewall rule to “Barrier,” making it easier to identify later.
  3. Direction Inbound: Specifies that the rule applies to incoming traffic.
  4. LocalPort 24800: Indicates that the rule applies to TCP traffic on port 24800, which is used by Barrier for communication.
  5. Protocol TCP: Specifies that the rule applies to the TCP protocol.
  6. Action Allow: Indicates that the rule will allow the specified traffic.

Help KVM clients

NixOS
vim /etc/nixos/configuration.nix
  networking.firewall = {
    allowedTCPPorts = [ ... 24800 ... ];
    allowedUDPPorts = [ ... 24800 ... ];
  };

vim ~/dotfiles/config (i3)
# They prevent i3's "helpful" behaviors that fight remote mouse control. Don't steal focus from new windows/popups
focus_follows_mouse no
mouse_warping none
focus_wrapping no

exec --no-startup-id i3-msg 'workspace $ws4; exec code --folder-uri vscode-remote://ssh-remote+myserver/mnt/data/justtothepoint'
# code --folder-uri "vscode-remote://ssh-remote+myserver/mnt/data/justtothepoint" is the documented way to open a remote folder via SSH.
# ssh-remote+myserver uses myserver from my ~/.ssh/config, which VS Code Remote‑SSH supports.

vim ~/dotfiles/alacritty.xml
# Some terminal emulators (like Alacritty, Kitty, or Xterm) have a feature that hides the mouse cursor as soon as you start typing to get it out of the way.
mouse = {
      hide_when_typing = true;  # ← HERE! Under [mouse]
    };
 netsh advfirewall firewall add rule name="
 Enable PING" protocol=icmpv4:8,any dir=in action=allow
  1. netsh advfirewall firewall add rule add a new rule to the Windows Firewall.
  2. name=“Enable PING”: Sets the name of the rule, making it identifiable.
  3. protocol=icmpv4:8,any: Specifies the protocol to be ICMPv4, specifically type 8 (which is echo request, used for ping), and allows any code.
  4. dir=in: Indicates that the rule applies to incoming traffic.
  5. action=allow: Specifies that the rule will allow the specified traffic.
  flatpak install flathub org.desktop.deskflow
  flatpak run org.desktop.deskflow
Bitcoin donation

JustToThePoint Copyright © 2011 - 2026 Anawim. ALL RIGHTS RESERVED. Bilingual e-books, articles, and videos to help your child and your entire family succeed, develop a healthy lifestyle, and have a lot of fun. Social Issues, Join us.

This website uses cookies to improve your navigation experience.
By continuing, you are consenting to our use of cookies, in accordance with our Cookies Policy and Website Terms and Conditions of use.