- VLC Media Player is a free, easy to use, and cross-platform multimedia player that plays almost everything! Why? Because it comes with most necessary codecs preinstalled. Installation: Windows (VLC Media Player, VLC, Download); brew cask install vlc (macOS), pacman -S vlc (Arch), sudo snap install vlc (Ubuntu).

- Play a Podcast: A. Open the Playlist manager: View, Playlist. B. Subscribe to the podcast: Internet, Podcasts, +. C. Type or paste the podcast address you want to subscribe to.
- Capture your desktop: A. Media, Open Capture Device. B. Select “Desktop” in the “Capture Mode”, modify the frame rate (30 or 60 fr/s), and in the dropdown arrow next to Play, select Convert. C. Profile, Video - H.264 + MP3 (MP4).
-
Media Player Classic-Home Cinema is a light-weight, easy to use, and open source media player for Windows that supports many video, audio, and image formats out of the box.
-
OBS Studio is a popular, free, and open source software for video recording and live streaming for Windows, Linux, and macOS.
-
HandBrake is a tool for converting video from nearly any format to a selection of modern, widely supported codecs. It is free, open source, and multi-platform (Windows, Mac and Linux).
-
Kodi is a free, open-source, software media center. It runs on Android, iOS, Windows, Linux, and macOS. Let’s configure it.
-
Add-ons, Install from repository, Kodi Add-on repository, Video Add-ons and add YouTube, Crackle, Pluto.TV or Popcornflix add-ons.
Kodi should only be used for content to which you have the legal right to access. Neither the Kodi Foundation nor justtothepoint.com advocates the use of Kodi for piracy in any way, shape or form.
-
Settings, System, Add-ons, and enable Unknown sources.
-
Add a new source (external repository): Settings, File Manager, Add Source (Check https://www.wirelesshack.org/) and a name (e.g., Crew).
-
Go back to the main menu and click Add-ons, Add-on Package Installer (the open-box icon at the top-left), Install from zip file, and select the new source (e.g., Crew, repository.thecrew-0.3.4.zip). Wait for the Repository to download, Install from repository, repository (e.g., The Crew Repo), Video add-ons, Repository (e.g., The Crew), Install.
- DaVinci Resolve is a free and popular video editing software. It is used by professionals and amateurs alike. It works on Mac OS, Windows, and Linux. It comes in two versions; the limited free version and the fully featured studio version.
The free version is robust on its own and has the capacity to do most of what an average user will need on a day-to-day basis.
- Alt‑Drag Brings Clips Into the Timeline Without Audio.
- ⚡ Speeding Up Clips While Keeping All the Footage. If you want to shorten the clips by making them play faster (e.g., changing them all to 150% speed), use the built-in Inspector tool. Select the clips you want to speed up. Look at the Inspector panel in the top-right corner of your screen. Scroll down until you see the Speed Change section. Make sure Ripple Timeline is turned ON (checked). This ensures that when clips shrink due to speed increase, the timeline closes the gaps automatically. Ripple ON is what makes the timeline behave like a single elastic band. Increase the Change Speed slider (e.g., changing it from 100% to 150% or 200%). All selected clips will shrink proportionally.
- Apply a fading effect between all of your clips at the same time. Drag a box over your timeline to select all the clips you want to fade together. Press Ctrl + T (Windows) or Cmd + T (Mac) . DaVinci Resolve will instantly place a standard Cross Dissolve fade at every single cut between your selected clips.
- Create an end frame with scrolling or static text for credits. (i) Open the Effects Library. Click on the Edit page icon at the bottom of the screen. In the top-left corner, click on the Effects button to open the effects library pane. In the sidebar that appears, click on Toolbox > Titles. (ii) Choose and Drop Your Title. Scroll through the Titles list to choose the style that fits your video: Scroll, Text+ (it allows for heavy customization) or Fusion Titles (clean, pre-animated templates). Click and drag your chosen title directly onto the timeline, dropping it right after your last video clip. (iii) Type and Customize the Text. Click on the newly added title block in your timeline so it is highlighted. Look at the Inspector panel in the top-right corner of your screen. In the large text box, type or paste your credits. Use the settings below the text box to adjust the Font, Size, Color, and Tracking.
- ✂️ How to Cut and Delete Part of an Audio Clip Using the Blade Tool. (i) You need the razor cursor to make precise cuts in the audio clip. Your cursor changes into a razor blade icon. (ii) Hover the blade over the green audio track. Click at the exact point where you want the cut. (iii) Switch back to the normal cursor (press A on your keyboard) so you can select and delete the cut segment. (iv) Remove the portion you cut away from the timeline.
- To export your video perfectly optimized for YouTube, you can use the dedicated YouTube preset on the Deliver page. This preset automatically applies the best video and audio settings recommended by the platform. (i) Click on the Deliver page icon at the very bottom right of your screen (it looks like a rocket ship icon). (ii) Choose the YouTube Preset. Look at the Render Settings panel in the top-left corner of the screen. Scroll horizontally through the preset icons at the top of the panel and click on YouTube. (iii) Configure Your Settings. Just below the preset, fill out the basic file details: Filename, Location, Resolution (make sure this matches your timeline, usually 1920 x 1080 HD or 3840 x 2160 Ultra HD), Frame Rate (ensure this matches your project settings, e.g., 24, 30, or 60). (iv) At the very bottom of the Render Settings panel, click the Add to Render Queue button. Your project will appear as a job in the Render Queue window on the far right of the screen. Click the Render All button at the bottom of that window. DaVinci Resolve will now build your MP4 file.
- To remove audio from clips in DaVinci Resolve, you need to unlink the audio and video tracks so you can delete the audio without deleting the video. (i) Right‑click the clip. (ii) Uncheck Link Clips (or press Ctrl+L). (iii) Select the audio portion. (iv) Press Delete.
- To remove spaces between clips in DaVinci Resolve quickly. Leave nothing selected on your timeline, go to the top menu bar, click Edit, and select Delete Gaps to close every space across all tracks.
- Refreshing an Updated Video. Right-click the clip inside your Media Pool, select Clip Operations, and click Replace Selected Clip.
Switch to the Settings view by pressing “s(ettings)”. Then, select the folder(s) on the left side/pane where you have stored your music files (e.g., ~/MyMusic) and press the space bar to add your music folders to the library.
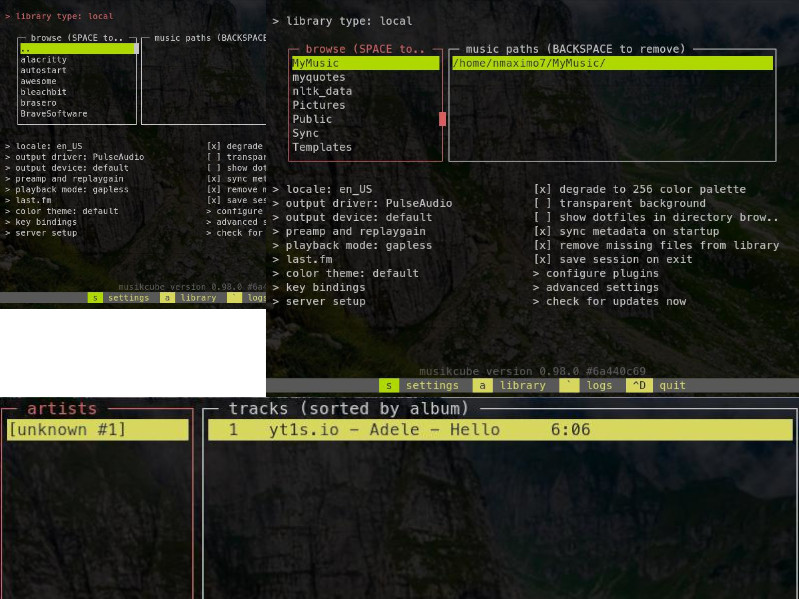
Once you have added all your music files and directories, hit a to switch to the Library view, select any song from the list and finally, press the ENTER key to start playing the selected or highlighted music file. To quit, press simultaneously the keys CTRL and D. To pause/resume, use the keyboard shortcut CTRL + P.